How to Cut Drywall

Knowing how to cut drywall is an important part of any home improvement or construction project. Even if you’re installing new walls or making repairs, a clean cut can make all the difference in how your finished surface looks and holds up over time. The procedure can look easy, but accuracy and the right technique matter. With a few tools and some practice, cutting drywall becomes a task you can do confidently and safely.
Understanding the Tools and Preparation Needed
Before making any cuts, it’s important to collect the correct tools and ready your work area. Good preparation helps reduce mistakes and stops material waste.
Measuring and Marking for Accuracy
The first step in cutting drywall is measuring the space where the panel will go. Use a tape measure to mark your measurements directly on the drywall sheet. A pencil works best because it leaves a visible but removable mark. When you are cutting multiple pieces, double-check each measurement to ensure it lines up perfectly with the framing or existing space.
Next, take a straight edge or drywall T-square to draw a clear line. This line is your guide for making the cut. If you’re cutting for outlets or light switches, it’s helpful to use a level to mark vertical and horizontal lines so everything stays upright.
Choosing the Right Cutting Tool
Drywall can be cut using some types of tools. The most common is a utility knife with a sharp blade. For thicker panels or curved cuts, a jab saw (also called a drywall saw) works well. Some professionals use rotary cutting tools for outlets or pipes, especially when time is limited. The tool you choose should match the cut you’re making, whether it’s a long straight line or a small opening.
Safety Before You Begin
Even though drywall seems harmless, safety should not be ignored. Cutting creates fine dust that you shouldn’t breathe in. Always wear a dust mask or respirator, and if you’re using a powered cutting tool, wear safety goggles. Gloves can protect your hands from sharp blades and rough edges, especially when snapping or sanding the board.
Step-by-Step Instructions to Cut Drywall Cleanly
Once you’re ready to begin, the cutting process can be completed in a few simple steps. Clean cuts save time when installation and improve the final look after taping and finishing.
Scoring the Face of the Drywall
With your panel laid flat and your guide line marked, use a sharp utility knife to score the front (paper side) of the drywall along the line. Apply firm pressure and keep the knife aligned with your straightedge for good results. You don’t need to press all the way through—just enough to create a groove in the paper and top layer of gypsum.
A second pass with the knife may be needed for thicker boards or if the blade is dull. Dull blades tend to tear the paper instead of slicing it, which can lead to a rough edge that’s harder to finish later.
Snapping the Board
Once scored, stand the drywall upright and apply a light push from the back side. The drywall should snap cleanly along the scored line. This is where precision matters—if the score wasn’t straight, the snap could run off-line. After snapping, fold the panel slightly like a book so you can access the back paper layer.
Cutting Out Openings
Learning how to cut drywall for outlets, pipes, and fixtures takes a bit more patience. Start by measuring and marking the exact location of the opening. A jab saw is ideal for making small square or circular holes. Push the tip into the drywall and move in a slow sawing motion. Try to stay within your marks to avoid gaps later.
For round cuts or multiple cuts in tight areas, a rotary tool with a drywall bit can be faster and cleaner, particularly during dealing with pre-mounted electrical boxes. Once the cutout is made, quick-dry the panel to ensure each thing aligns before fixing it into place.
Common Mistakes to Avoid While Cutting Drywall
Learning how to cut drywall properly also means knowing what not to do. Even a small mistake can cost you time, money, or the look of your finished wall.
Rushing the Scoring Process
One of the most frequent errors is rushing through the scoring step. If the blade skips or your line is uneven, the drywall won’t snap cleanly. That leaves jagged edges that are hard to align. Taking an extra 10 seconds to re-score the line can save time on sanding or repair work later.
Cutting Without Support
When the drywall isn’t fully supported during cutting, it may crack or crumble. This happens a lot when working with long sheets or trying to cut mid-air. Always use sawhorses or lay the board on a stable surface. Letting one side hang over a ledge often results in unintended breaks.
Forgetting to Label or Orient Panels
After making several cuts, it’s easy to lose track of which piece fits where. Labeling the back of each cut piece with a pencil helps avoid confusion during installation. If you’re cutting for multiple outlets or uneven wall sections, this small step keeps everything in order.
Read more: How to Patch Drywall?
Tips to Improve Cutting Results Over Time
The more you cut drywall, the easier it becomes. Still, there are small tips that even experienced builders use to get consistent results.
Change Blades Frequently
Utility knives work good when blades are sharp. If you notice tearing, hesitation, or drag while cutting, replace the blade immediately. A sharp edge provides cleaner lines and helps prevent tearing the paper face of the board.
Test Fit Before Screwing
After every cut, quick-dry the piece into place before fixing it. This helps you confirm measurements and correct minor mistakes before finishing. Panels that do not align can lead to noticeable seams or uneven joints later.
Practice on Scrap Pieces
If you’re new to drywall work, so you should practice on some scrap panels before cutting into full sheets. This will build confidence and help you understand how much pressure to use during scoring and snapping.Mastering how to cut drywall takes practice, the right tools, and patience. However you are doing straight cuts, openings, or repairs, clean edges and good fit are key to making your drywall job look professional. Always measure carefully, score deeply, and cut with control.
How to Patch Drywall

If your wall has dents, holes, or cracks, you might be thinking how to patch drywall without calling a contractor. Luckily, repairing drywall is simpler than you may think. With a few tools, some patience, and the right technique, your walls can look like new again—no major renovation needed. Whether you’re fixing a doorknob-sized dent or a larger damaged section, drywall repair is a basic home improvement skill that can save you money and boost your confidence.
Knowing the Type of Drywall Damage You’re Fixing
Not all drywall damage is the same, so the repair method changes based on what you’re dealing with. Before reaching for joint compound or tape, take a closer look at the problem.
Small Holes and Surface Dings
Nail holes from picture frames or dings from furniture are the easiest to patch. These shallow imperfections don’t go deep into the drywall panel and can usually be repaired with just some spackle or lightweight joint compound. They require no cutting or mesh, just a smooth application followed by light sanding.
Medium-Size Damage
When the hole is a bit bigger—perhaps from a doorknob or a failed wall anchor—you’ll need a patch. These areas often need a mesh patch or pre-cut drywall repair kit to support the compound. If ignored, the wall may remain weak or even crack more.
Large Holes or Cut-Outs
Sometimes, holes can be too big to fill with spackle or mesh, in these cases you need to cut out a square around the damage and put a new piece of drywall. This method may sound advanced, but it’s manageable with a bit of care. Learning how to patch drywall well means being prepared for these larger jobs too.
Prepping the Wall and Tools Before You Begin
Jumping straight into patching without setup is a recipe for poor results. A clean, solid surface is key for a long-lasting repair.
Cleaning and Checking the Area
Start from clearing away any loose drywall or dust around the damage. Use a sheetrock knife to remove any broken pieces of paper or spackling compound. A shop vacuum or dry brush helps remove the remaining debris. The cleaner the area, the better your compound will stick.
Look at the edges around the hole. Are they solid, or crumbling? If the drywall is cracked or soft around the damage, expand your repair area until the edge feels strong. Weak edges will lead to future cracks even after you’ve finished patching.
Gathering the Right Tools and Materials
To get a proper patch, you’ll need a few simple tools: a utility knife, drywall saw, sanding sponge, putty knife, joint compound or spackle, and possibly a mesh patch or scrap drywall. For larger repairs, drywall screws, a drill, and a backing board may be required.
It’s always a good idea to lay down a drop cloth under the repair area. Even a small patch job can generate dust that sticks to floors and furniture.
Step-by-Step Guide to Patching Like a Pro
Once the area is ready already and your tools are ready, it’s time to patch. Even beginners can follow this step-by-step method and get professional-looking results.
Applying a Quick Fix for Small Holes
For nail holes or tiny dents, squeeze a bit of spackle onto a putty knife and press it into the hole. Remove the excess and let it dry. Once it dry, sand it smooth and apply a second layer if needed. After a final sanding, it’s ready for paint.
These quick repairs are perfect for refreshing walls before painting or putting a home on the market. Understanding how to patch drywall at this level makes home upkeep faster and less stressful.
Using a Mesh Patch for Mid-Sized Damage
For holes around 2 to 5 inches wide, a self-adhesive mesh patch works well. Stick the patch over the hole, then apply joint compound over the entire area using a wide putty knife. Smooth it out so the edges blend with the wall. Allow it to dry, then sand it down and apply another layer if needed.
Be sure to feather the compound past the patch so the final surface doesn’t leave a visible ridge. Once it’s smooth, it’s ready for priming and painting.
Cutting and Replacing Large Sections
When the hole is more than 5 inches or shaped irregularly, cut a clean square around the damage with a utility knife or drywall saw. Then, cut a new piece of drywall to fit that hole.
Secure a backing board behind the wall opening using screws or adhesive, then screw the patch into place. Cover the joints with joint tape. then apply joint compound in smooth, thin layers. Sand between layers and build up the surface slowly until it’s flush.
This method takes more time but results in a nearly invisible repair. You’ll appreciate having mastered how to patch drywall when a larger repair comes your way unexpectedly.
Tips to Avoid Common Mistakes and Finish Strong
Patching drywall can be straightforward, but a few common errors can cause frustration or leave behind an obvious blemish.
Rushing the Drying Time
Each layer of joint compound needs to dry fully before sanding or painting. Trying to move too quickly can cause peeling, cracking, or dust that clogs your paint. Give the compound the time it needs—even if the surface feels dry to the touch, the inside may still be soft.
Skipping the Sanding Step
Sanding is just as important as patching. Without sanding, your wall will feel bumpy and look uneven after it painted. Use a sanding sponge for smooth blending. For large patches, sand a wider area so the repair blends seamlessly into the wall surface.
Not Matching Paint or Texture
When your repair is dry and smooth, the last step is priming and painting. Always use a primer before applying paint, or the patch may absorb paint differently than the rest of the wall.
For textured walls, you will need to match the texture before painting. Spray texture kits or sponge dab technique can help replicate orange peel or knockdown finishes.
Read more: How to Install Vinyl Plank Flooring?
When You Know How, You Control the Outcome
Learning how to patch drywall gives you more than just a clean wall. It gives you the confidence to fix damage quickly, skip unnecessary repair costs, and keep your home looking its best. Whether you’re covering up small dings or replacing whole sections, the method is in your hands. The more you practice, the better your results—and the less anyone will ever know a hole was there.
How to Install Vinyl Plank Flooring
Vinyl plank flooring has become a favorite in homes, offices, and also retail spaces. With its sleek wood-like look, waterproof features, and easy installation, it’s no wonder that so many people are choosing this budget-friendly option. Even if you’re upgrading your kitchen, basement, or living room, knowing how to install vinyl plank flooring can save you money while giving your space a polished, modern feel.
But do not let its simplicity fool you. Installing vinyl plank requires a sharp eye and a bit of patience. With all preparation, careful cuts, and smooth execution, you can achieve professional-level results all on your own.
Planning Before You Start
Every successful project begins with planning, and laying vinyl plank is no exception. Making the subfloor right and understanding your space helps avoid problems later.
Evaluating the Subfloor
First, clear the area completely and check what lies under. You need a flat, dry surface before installing any type of flooring. Remove old carpet, nails, and leftover adhesives. If your subfloor is concrete so test it for moisture using a plastic sheet taped down overnight. For wood subfloors, make sure everything is nailed tightly and doesn’t squeak.
Vinyl planks are flexible but unforgiving on uneven floors. Dips, bumps, or cracks will show once the floor is in place. If needed, use a self-leveling compound to fix trouble spots and sand down any high ridges.
Letting the Planks Acclimate
Vinyl flooring needs time to adjust to the room. Leave the boxes unopened in the space where they’ll be installed for at least 48 hours. This allows the material to adapt to temperature and humidity. Skip this step, and you risk shrinking, expanding, or warped planks later.
Designing the Layout
Before you start locking anything into place, take measurements. Think about how the planks will line up with the walls and where seams will land. Most people install planks parallel to the longest wall or the way natural light enters. If the final row looks too narrow, adjust your first row to balance it out.
A chalk line snapped across the room gives you a straight guide to follow. A little extra planning now will make the entire project easier and more accurate.
Installing the Floor Step by Step
This is the exciting part—transforming your space with each plank you snap into place. But take it slow. Precision here makes all the difference.
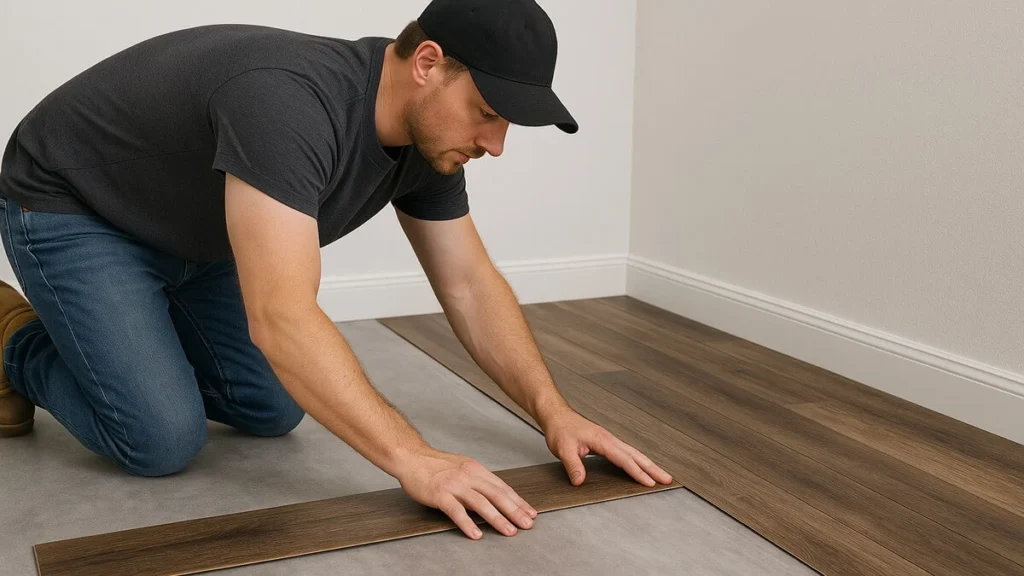
The First Row Matters Most
Start in a corner of the room, placing your first plank with its groove side facing the wall. Use spacers to leave an expansion gap—about ¼ inch—between the wall and the planks. This gives the floor room to expand without buckling.
The first row must be completely straight. Any mistake here will throw off every row after it. Make sure each plank locks tightly with its neighbor. Tap gently with a rubber mallet and a tapping block for a snug fit, but don’t force it.
Staggering Seams for Strength
You should never line up plank seams in straight lines. Instead, stagger them by starting each row with a different-length plank. This not only looks better but also strengthens the entire floor system. Most manufacturers recommend keeping end joints at least 6 inches apart from row to row.
Use offcuts from the previous row to begin the next. This reduces waste and keeps your layout natural and consistent.
Handling Obstacles and Corners
Doorways, vents, and tight corners can slow you down but with careful cutting you can fit planks around almost anything. A jigsaw or oscillating tool helps you shape around doorframes and pipes. Don’t rush these cuts—take your time to measure, mark, and double-check.
If needed, undercut door frames and slide the planks underneath for a unseamed look. For larger gaps, plan to cover them with baseboards or transition strips later.
Finishing Touches that Complete the Look
You’ve laid the planks, but the project isn’t quite done. The final steps give your floor its clean, finished appearance—and help protect your work for years to come.
Locking in the Last Row
The last row is usually the narrowest and trickiest to install. Measure the gap, cut the planks lengthwise, and click them into place with a pull bar. Be sure to maintain that expansion gap here too.
Cutting these final pieces takes care and patience. It is worth taking your time to avoid damaging the edges or leaving rough spaces.
Reinstalling Baseboards and Trim
When the planks are fully installed, remove the spacers and reinstall your baseboards or trim. This covers the expansion gap and frames the room nicely. If you removed any door casings, put them back in place after cutting them to fit over the new flooring.
Also, install threshold strips where the vinyl meets other types of flooring, like tile or carpet. This makes the transition smooth and visually appealing.
Cleaning and Maintenance Tips
Clean or vacuum the floor completely after installation. Use a damp—not wet—mop for the first clean. Avoid harsh chemicals and always follow manufacturer cleaning instructions. Vinyl is durable, but securing it from scratches and dents will extend its life.
Add felt pads to furniture legs and arranging mats at entrances to reduce dirt and debris. With regular care, your vinyl plank floor will keep its luster for years.
Read more about: How to Mud Drywall?
A DIY Project Worth Taking On
Mastering how to install vinyl plank flooring is more than just a skill it’s a chance to transform your home with your own hands. The process is simple enough for beginners, yet rewarding enough for seasoned DIYers. You get a high-end wood look, moisture resistance, and a surface that holds up under daily life.
And because installation doesn’t require expensive tools or special training, it’s one of the most budget-conscious flooring options available today. Even if you’re revamping a room or remodeling an entire home, knowing how to install vinyl plank flooring helps you get the most value from your investment.
In the end, it is not just about saving money or improving aesthetics—it’s about pride in the finished product. From the first plank to the final trim, understanding how to install vinyl plank flooring gives you the power to take your space to the next level.
How to Mud Drywall
Learning how to mud drywall is essential for anyone diving into home repairs or building projects. It’s the procedure that makes walls look clean, smooth, and paint-ready. While hanging drywall is one step, applying joint compound (or “mud”) takes it to the next level. Without mudding, drywall joints and screw holes remain visible. With it, your walls look flawless and professional. Even if you’re a starter or tackling your first big project, understanding the right technique makes all the difference.
The Work Before the Mud
Before applying any joint compound, the surface and surroundings must be prepared properly. This helps the mud bond well and makes sure a cleaner job.
Remove Dust and Scrape Imperfections
The first step is clearing off any drywall dust or paper scraps. Use a dry cloth or broom to brush off each seam and corner. If there are sharp bits, glue, or leftover pencil markings, use a utility knife or scraper to smooth them down. This cleaning step may feel small, but it’s essential to helping the mud stick evenly.
Apply Tape Over Seams
Drywall tape acts like a bridge between panels. Without it, mud will crack along the seams over time. There are two kinds: paper tape and mesh tape. Paper tape is stronger but needs more skill to apply. Mesh is easier for beginners. Line up the tape right down the center of each joint and press it flat. Inside corners also need tape—fold the tape along the crease and press it in evenly.
Pick the Right Joint Compound
For first-timers, premixed joint compound is best. It’s ready to use straight out of the bucket and gives you time to work before drying. Professionals often use setting-type compound (hot mud), which dries faster but needs to be mixed. If you’re just learning how to mud drywall, stick with premixed for more control.
Applying the First Coat
The first layer of mud is all about coverage. This coat hides the tape, fills screw holes, and starts blending everything together.
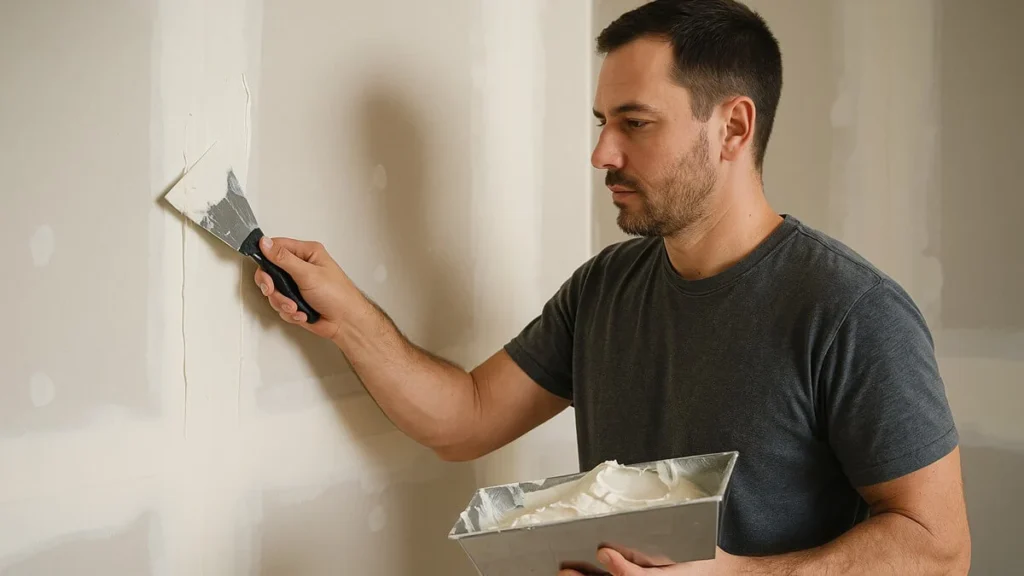
Cover Seams with Consistent Pressure
Use a 6-inch taping knife for the first coat. Scoop a small amount of mud and spread it evenly over the taped joints. Hold the knife at a slight angle and press the mud into the seam. Your goal is to bury the tape without adding too much thickness. Remove extra compound as you go to keep the surface flat.
Fill Screws and Nails
Tiny holes left by screws or nails also need to be covered. Apply a little mud over each one and scrape it flat. Don’t worry about perfect smoothness yet—just focus on filling everything. Once dry, you’ll be able to sand and touch up later.
Don’t Forget the Corners
Inside corners take patience. Use a corner knife or a regular 4-inch taping knife. Apply mud to both sides of the corner and smooth it out with even strokes. These areas will need more sanding later, but they form the foundation of the wall’s shape and should be treated carefully.
The Second Coat
Once the first coat dries completely (usually 12–24 hours), the next coat is used to smooth rough areas and feather the edges farther out.
Use a Wider Knife for Better Spread
Move up to a 10-inch or 12-inch drywall knife for the second coat. Spread the mud wider than the first layer so you’re gradually blending the seam with the rest of the wall. Keep your strokes smooth and avoid deep ridges. You’re not just hiding seams—you’re sculpting a wall.
Smooth Corners and Build Layers
For corners, apply more mud on each side and feather it outward. If the first coat was bumpy or thin, this second layer should fix it. Don’t rush, and don’t overload your knife—thin layers dry better and sand easier.
Check for Flaws Using a Work Light
Shine a flashlight or work light across the wall at an angle. This will show dips, lines, or raised areas that might not be visible straight on. Use this check as a guide while working. The more even your mud, the less sanding you’ll need.
Final Coat and Sanding
The third coat is your finishing layer. This one is all about blending and polishing the wall to look like one smooth surface.
Go Thinner and Wider
The final coat should be the thinnest. Use the widest knife you can manage to extend the feathered edges even farther. This makes seams completely disappear once painted. You shouldn’t see any tape lines, screw spots, or blade marks after this coat is done.
Let It Dry Without Touching
Give this coat a full day to dry. Even if it looks dry on the surface, touching or sanding too early can ruin the finish. Once fully dry, run your hand gently across the surface. You should feel a smooth, even plane. If not, touch up lightly with more compound.
Sand with Care and Precision
Use fine-grit sandpaper or a sanding sponge to smooth everything. Always sand in a circular motion and use soft pressure. The idea is to blend—not remove. Over-sanding can damage the paper and undo all your hard work. If dust is a concern, use a damp sponge instead of dry sanding to reduce particles in the air.
Mudding Ceilings, Corners, and Special Spots
Walls aren’t the only places that need mud. Ceilings and inside corners require their own attention. Knowing how to mud drywall also means knowing how to adapt for tricky spaces.
Overhead Work on Ceilings
Mudding ceilings uses the same technique as walls but requires more stamina and control. Use smaller batches of compound to avoid dripping and take breaks as needed. Ceiling seams should be feathered wider since overhead lighting will reveal every flaw.
Inside and Outside Corners
Corners should be done slowly and with precision. Inside corners use folded tape and a corner knife. Outside corners often use metal or plastic corner beads, which need to be covered with multiple layers of mud to become invisible. Both types of corners usually take more sanding than flat seams.
Matching Wall Textures
Once the mud is dry and sanded, you may need to match the texture of the surrounding wall. Spray texture or sponge techniques can copy knockdown, orange peel, or other styles. Always test the texture first on scrap drywall or a hidden section before applying it everywhere.
Read more: How Thick Is Drywall?
Why This Skill Pays Off
Learning how to mud drywall gives you the freedom to repair, remodel, or build without hiring out for every job. It’s not just about covering joints—it’s about creating a perfect surface that’s strong, smooth, and ready for anything. However you’re flipping a room or fixing one bad spot, you now have the steps and confidence to make your walls look professional. With each project, your mudding skills will improve, saving you time, money, and frustration down the line.
How Thick Is Drywall
During planning a build or renovation, one question always comes up how thick is drywall supposed to be? The answer isn’t one-size-fits-all. Different projects call for different drywall thicknesses based on purpose, code compliance, and performance needs. Even if you’re tackling ceilings, dividing rooms, or soundproofing a workspace, drywall thickness plays a major role in both function and durability. Understanding the standard sizes, specialized types, and real-world applications ensures you pick the right option the first time.
What You Need to Know About Standard Drywall Sizes
Most people assume drywall comes in just one size, but it’s available in a range of thicknesses. Choosing the right one depends on how it’s going to be used and the environment it’s placed in.
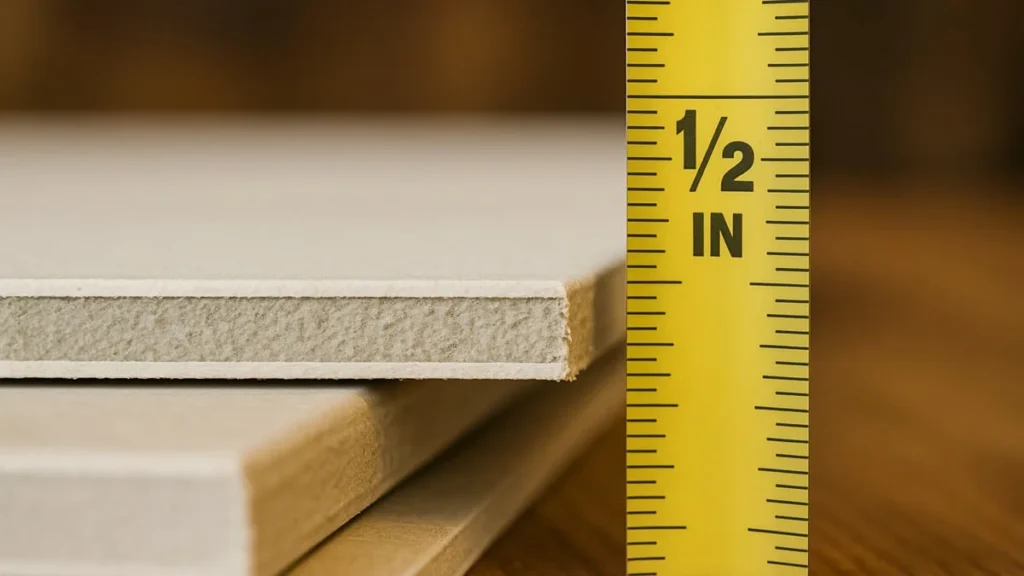
1/2-Inch Is the Most Common Choice
For residential interiors, 1/2-inch drywall is the gold standard. It is strong enough for most walls and ceilings and light enough to make installation manageable. It’s the go-to choice for living rooms, bedrooms, and even kitchens, where strength, finish quality, and affordability all matter. It works best with 16-inch stud spacing and offers just enough thickness to resist minor impacts and allow for texture or paint finishes.
5/8-Inch Is Built for Strength and Safety
In commercial spaces or where enhanced fire resistance is required, 5/8-inch drywall becomes necessary. It resists sagging over time, especially when used on ceilings and it meets fire code requirements in many areas. This thickness also offers better sound insulation and is frequently found in apartment buildings, offices, and garages that connect to homes.
Thinner Boards for Special Applications
There are also 1/4-inch and 3/8-inch drywall panels. These thinner boards are not used for primary wall structures but they are ideal for curved surfaces, covering existing walls, or patching damaged sections. Because they lack rigidity, they’re more of a supplemental material than a structural necessity.
Performance Considerations Beyond Thickness
While understanding how thick is drywall is essential, knowing what’s inside or behind that drywall matters just as much. Performance often hinges on what problem you’re trying to solve—whether it’s water exposure, noise, or fire safety.
Fire Resistance and Building Codes
Fire-rated drywall is typically 5/8 inches thick and contains additives like fiberglass to slow down combustion. It’s often required between attached garages and living spaces or in multifamily construction where added safety is mandated. Using the wrong thickness here won’t just fail an inspection—it can put lives at risk. So that checking your local code and selecting approved fire-rated panels is a must.
Moisture-Resistant Solutions
Greenboard and purple board drywall are available in both 1/2-inch and 5/8-inch thicknesses and are formulated to handle humidity better than standard gypsum. While not suitable for direct contact with water, these boards work well in bathrooms, laundry rooms, and damp basements. They hold up better over time and help prevent mold growth where moisture is a regular concern.
Sound Dampening Benefits
When sound isolation is a goal—like in media rooms, home offices, or shared walls—drywall thickness makes a difference. A single layer of 5/8-inch board helps reduce noise transfer, and when combined with acoustic insulation or a second drywall layer, results are even better. In fact, some builders choose specialty soundproof drywall panels that mimic the density of multiple boards in one thick panel.
Installation Impact
Understanding how thick is drywall also helps prepare for what the installation process will be like. Thicker panels offer more benefits, but they’re also heavier and more labor-intensive.
Handling and Cutting Differences
While 1/2-inch drywall is manageable for most do-it-yourselfers, 5/8-inch panels can be cumbersome and commonly require two people or drywall lift, especially for overhead work. The added density also makes cutting slightly more difficult. By using the right utility knife and supporting the board properly helps maintain accuracy and reduces cracking or splitting.
Joint Treatment and Finishing
Thicker boards provide a more stable base for taping and mudding because they avoid flexing and movement at seams. This helps prevent cracking in the joint compound over time and results in smoother finishes. Professional contractors often prefer working with 5/8-inch panels in high-end projects where finish quality is critical.
Weight and Load on the Structure
A normal 4×8 sheet of 1/2-inch drywall weighs about 50 pounds, while the same sheet of 5/8-inch can weigh over 70 pounds. That’s an important difference when covering large areas. It’s important to ensure the framing and support system can handle the additional load—especially in ceiling applications.
Click for Drywall Estimating Services.
Room-by-Room Recommendations
Applying the right thickness of drywall based on room use improves durability, appearance, and long-term value. Here’s how the choice plays out across a typical building.
Bedrooms and Living Rooms
Standard 1/2-inch drywall works perfectly for these rooms. It’s money-saving, meets structural needs, and gives a smooth finish that accepts paint or wallpaper easily. There’s generally no need for extra thickness unless you’re targeting advanced soundproofing.
Bathrooms, Kitchens, and Utility Rooms
These spaces benefit from moisture-resistant drywall, and while 1/2-inch may still suffice, 5/8-inch greenboard offers extra durability and better resistance to humidity. Installing the right board from the start prevents future problems like mold or softening.
Garages and Fire-Resistant Walls
In these areas, code often requires 5/8-inch fire-rated drywall. Not only does this improve safety, but it also holds up better in environments where impact and exposure may be more intense, such as garage workshops or storage areas.
Ceilings and Large Spans
Thicker drywall is important for ceilings over large spans. 5/8-inch panels help prevent sagging and give the room a clean, flat look. This is particularly important in living rooms or basements where you want a professional-grade finish.
Read more: How to Price Concrete Jobs?
Final Thoughts
If you’ve been thinking about how thick is drywall, the answer depends on where and how you plan to use it. Residential walls normally use 1/2-inch panels, but ceilings, fire-rated assemblies, and sound-sensitive areas may require 5/8-inch or specialty boards. By matching the drywall thickness to the demands of each space, you get better durability, safer structures, and an overall smoother finish. Making the right choice upfront prevents costly rework and keeps your build in line with both performance and code.
How to Price Concrete Jobs

Understanding how to price concrete jobs is an important skill that every concrete contractor must master to stay profitable. Whether you’re handling small residential pours or large-scale commercial slabs, your success starts with knowing how to give an accurate, fair, and competitive quote. This is not just about knowing the cost of materials, it’s about to understand the job carefully which includes labor, tools, site conditions, overhead, and profit. Knowing this can help you grow your business, build trust with clients and conserving on undercut projects.
Assessing the Job Scope and Site Conditions
Each job starts with details so before you estimate a price, it is important to know exactly how to price concrete jobs, what client wants, and what the job will require. This begins with visiting the site or at least reviewing clear drawings or specifications. Simple driveway may sound easy until you find out it needs to be reinforced, sloped for drainage, or poured in sections. The surface area, concrete thickness, and reinforcement requirements will all influence your final cost.
Measuring Dimensions and Concrete Volume
Once you know the layout, measure the length, width, and thickness of the area to be poured. Multiply these to get the total cubic feet, then divide by 27 to convert to cubic yards. Most ready-mix concrete is sold by the cubic yard, so this number forms the base of your material cost. It’s wise to add around 10 percent extra to cover waste or overpouring, especially if the grade is uneven.
Examining Site Access and Obstructions
The location of the pour is just as important as its size. A backyard that’s difficult to access might require additional labor to move materials by hand or with wheelbarrows. Limited truck access, slopes, or existing landscaping can all increase time on site. These hidden costs of labor and tools must be added to your estimate from the starting.
Calculating Materials, Labor, and Time
After assessing the site and job type, begin listing out the materials and labor required. The cost of concrete varies depending on your location, but a typical range is $100 to $150 per cubic yard. Along with the concrete itself, you will need to account for the base gravel, form boards, steel augmentations like rebar or mesh, curing agents, and sealers if requested.
Estimating Labor and Manpower
Labor is major part of your cost. You need to calculate how long the job will take and how many workers are needed to complete each phase. This includes preparation, forming, pouring, finishing, and clean-up. Even if the concrete pour only takes one day, preparation might take another full day or more. Your own time should be included in the labor cost, whether you’re on-site supervising or doing the work yourself.
Allowing for Tool and Equipment Usage
Every concrete job requires tools—whether that’s a concrete mixer, saw, vibrator, power trowel, or pump. If you’re renting equipment, those fees should be included. If you own the equipment, consider charging a usage rate that helps cover wear and tear. You must also include fuel, delivery costs, and setup time for tools, especially on larger or more difficult jobs.
Covering Overhead and Building in Profit
Beyond materials and labor, your pricing should reflect the real cost of running your business. This includes expenses that do not directly appear on the job site but are always present—things like insurance, office expenses, vehicle maintenance, tools, software subscriptions, and advertising. A fair portion of these overhead costs should be included in every quote.
Setting a Realistic Profit Margin
Your profit is the thing that allows your business to grow and survive in slow seasons. Once you have calculated all your direct and indirect costs, you should add a reasonable profit margin, typically between 15 and 30 percent depending on your market. Some contractors worry about that adding too much profit will scare off customers, but clients will often pay more when they understand the quality and professionalism behind the service.
Accounting for Contingencies and Delays
No job goes perfectly every time. Unexpected weather, late changes or hard-to-dig soil can delay work, or increase the cost, you cannot plan for everything but you can be prepare for common issues by building small safety margins into your labor or time estimates. Clear communication with clients from the start helps to manage expectations and prevents problems during the job.
Presenting Your Estimate Clearly
It’s important to deliver a clear and detailed estimate when your numbers are ready. A well-written quote should list the job scope, material specs, labor details, equipment usage, start and end dates, and total cost. It should also include your payment terms and how long the quote is valid. Clients respect the clearness and a detailed estimate makes you professional.
Explaining What’s Included and What’s Not
Clients need to know exactly what they’re paying for. Be upfront about what’s included, such as rebar, gravel base, or sealing. Just as important is stating what’s not included. Say so if demolition, grading, or permit costs are not part of your service because this avoids confusion and keeps both parties on the same page.
Building Trust Through Clarity
When you understand how to price concrete jobs, you don’t just protect your business—you build credibility. Clients trust contractors who present detailed quotes and are willing to explain them. Whether your price is slightly higher than the price of someone else the clear communication and confidence in your work can win the bid.
Read more: How to Get Oil Out of Concrete?
Staying Competitive Without Undervaluing Your Work
It’s tempting to lower prices to win more jobs, especially in competitive areas. But underpricing leads to burnout, rushed work, and thin profit margins. Focus instead on offering value—quality materials, experienced labor, clear timelines, and reliable service. If your prices reflect the true cost of doing business, you’ll attract clients who respect your work and want long-term results.
Knowing how to price concrete jobs the right way means being prepared, precise, and professional. When your quote reflects real costs, smart planning, and fair profit, you protect your time and deliver results clients can count on. In the end, that’s what sets great contractors apart.
How to Get Oil Out of Concrete?
Accidental oil spills on your driveway or garage floor can look permanent, but by learning how to get oil out of concrete you can be saved from expensive repairs. Remove stains effectively requires, careful preparation, the right cleaning agents, scrubbing techniques, thorough rinsing, and long-term protection. Whether you’re dealing with a small, fresh drip or old, ground-in grease, this guide gives you straightforward steps you can follow at home to restore your concrete surfaces and keep them looking clean for years.
Preparing the Concrete Surface
Before applying any cleaning method, preparing the surface is essential. This initial stage of how to get oil out of concrete includes identifying staining, removing residue, and choosing proper materials so your cleaning efforts actually work.
Identifying Fresh vs. Stubborn Stains
If the oil is new, you’ll want to act fast. Gently blot up any visible liquid using paper towels or absorbent cloths. Doing this quickly minimizes spread and surface penetration. For older, stubborn stains, start by scraping off thick residues and thoroughly sweeping the area to remove dust, sand, or debris. A clean starting point helps ensure cleaning materials target the oil, not loose grit or dirt.
Choosing and Applying Absorbents
Common household items—clay kitty litter, baking soda, cornstarch—work surprisingly well at soaking up oil from concrete. For deeper or larger stains, try industrial absorbents designed for petroleum liquids; spread at least two inches thick and leave it for thirty minutes to overnight. The longer you wait, the more oil the material draws out of the concrete pores. During this phase, cover the area to prevent spreading and to concentrate absorbent power.
Preparing for Deeper Treatment
After initial absorption, you may still see an outline of the stain. That’s okay. At this point, prepare to use dish soap or chemical cleaners. Make sure you have proper tools—a stiff nylon brush, gloves, goggles—and a hydrogen peroxide or trisodium phosphate solution ready, depending on your next cleaning steps.
Cleaning with Soap, TSP, or Stronger Chemicals
Once the absorbent phase is done, proceed to workload options for how to get oil out of concreteusing cleaning solutions ranging from gentle soap to professional-grade chemicals.
Starting with Dish Soap or Simple Degreaser
Start with warm water that is mixed with a grease-cutting dish soap like Dawn. Dish soap helps break oil into smaller particles the water can wash away. Apply the soapy paste generously to the stained area, let it sit for a few minutes, then scrub with the nylon brush. This method is effective for moderate oil spills and is often enough to vanish the stain instead of using stronger chemicals.
Applying Trisodium Phosphate for Stubborn Grease
For old or deep-rooted stains, dish soap may not be enough. That’s when trisodium phosphate (TSP) comes in. Mix it with warm water, pour it over the stain, and scrub after a few minutes. The alkaline nature of TSP breaks down oil molecules in the concrete’s pores. Rinsing clean after TSP treatment can remove stubborn stains that a dish soap couldn’t tackle alone.
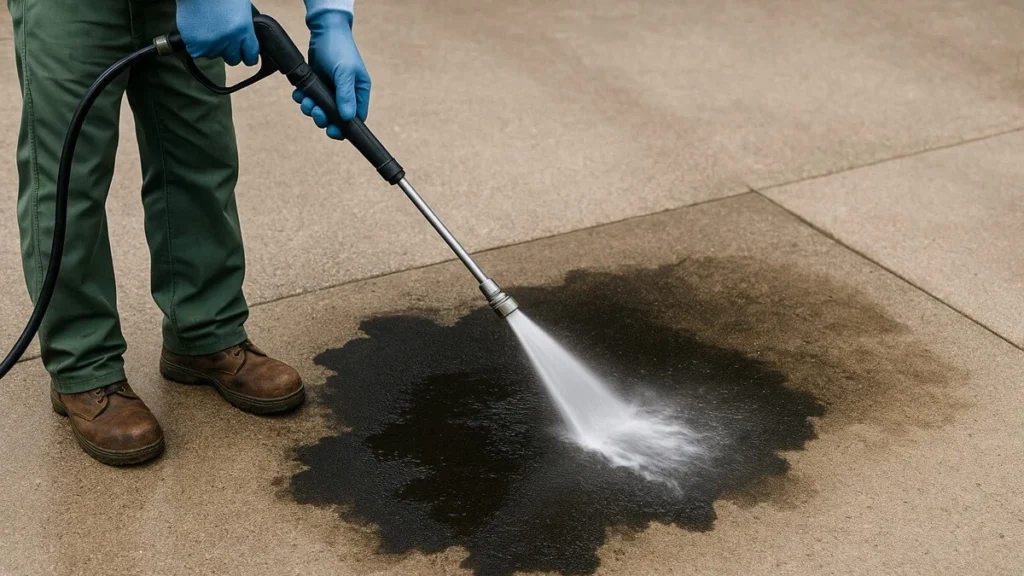
Resorting to Muriatic Acid as a Last Option
Some stains are deeply embedded and resistant even to TSP. A dilute muriatic acid solution can help. But, use it with extreme caution through wearing protective gear goggles, long sleeves, gloves, and ventilate the area. Apply the solution carefully, scrub lightly, and rinse thoroughly until the acid is completely gone. Because it’s so harsh, consider it only after soap and TSP have failed.
Scrubbing Techniques and Thorough Rinsing
Once cleaning agents are applied, solid scrubbing and rinsing are critical steps in your guide on how to get oil out from the concrete.
Using Nylon Brushes Carefully
Avoid wire brushes, which can scratch or chip concrete. Instead, use a stiff nylon brush. Scrub in circular motions with moderate pressure. Take your time; cleaning deeper pores may take several passes. As the oil lifts, you’ll see the concrete lighten.
Rinsing Thoroughly for True Results
After scrubbing it, rinse off soaps or chemicals thoroughly with a hose or low-pressure washer. Let the concrete dry completely. Drying often reveals leftover staining that was hidden when the surface was wet. If you still see oil traces, repeat the cleaning cycle until the concrete appears clean.
Evaluating Results and Repeating as Needed
Sometimes one pass is not enough. Inspect the dry surface carefully, if any discoloration remains there, you have to repeat the entire process of absorb, clean, scrub, rinse. This patience ultimately leads to full restoration, even if with old or stubborn stains.
Protecting the Surface and Preventing Future Stains
After restoring your concrete, protection and maintenance become key to preserving the results you worked hard to achieve.
Applying Concrete Sealers for Long-Term Defense
Sealing is a critical step after you remove stains. A high-quality concrete sealer creates a barrier that stops oil from penetrating deep pores. After rinsing and drying your final cleaning, apply a sealer according to product instructions. Reapply every couple of years to maintain protection and make future stains easier to remove.
Establishing Quick Response Routines
Have absorbent materials like baking soda or kitty litter on hand. When spills happen, act immediately—blot up the oil, then apply the absorbent before cleaning with dish soap. Quick action prevents deep penetration and protects the sealed surface from damage or permanent staining.
Managing Cleanliness By Regular Care
Preventative care makes big difference. Sweep driveways, garage floors, and parking pads frequently to stop dirt from trapping oil. Use a mild detergent wash a couple of times a year to refresh the surface, remove light films, and spot new stains before they set. Regular maintenance preserves concrete appearance and extends sealer life.
Read more: How to Refinish Hardwood Floors?
Final Thoughts and Pro Tips
Mastering how to get oil out of concreteallows you to restore surfaces effectively without expensive work. Follow the steps closely: absorb, clean, scrub, rinse, seal, maintain. With every cycle, even if stubborn stains fade, but, if home methods fail call a pro who can give specialized cleaning processes like pressure washing with heated water or sandblasting.
Overall, patience and proper procedure matter the most. Combining good tools, safety gear, and planned maintenance keeps concrete looking fresh for years.
How to Refinish Hardwood Floors?
Understanding each step of the process that makes a worn or scratched wood flooring to a smoother, refreshed surface again, is involved in learning how to refinish hardwood floors. Hardwood flooring can last for many years, but over time it may show signs of use, such as dull spots, scratches, or discoloration. Refinishing does not need to replacing the floor; instead of this, to restore the wood’s appearance, the top layer is polished and coated again.
Conditions That Require Refinishing
Floors that are scratched, faded, or uneven in color often show that the protective finish has worn away. Surface with heavy foot traffic can be look more damaged than the corners or edges. In some cases, water exposure or stains from furniture legs can also leave marks, that make wood look old and damaged. These signs usually indicate that the top coating, whether it’s polyurethane or another finish, has broken down and no longer protects the surface.
Refinishing can address surface-level damage, but it does not fix deep cracks or warped boards. Before starting, it is important to inspect whether the floor is solid hardwood or engineered hardwood. Solid wood can be sanded multiple times, while engineered wood has a thinner top layer that may only allow one refinishing process, depending on its thickness.
Preparing the Room for Refinishing
The process of refinishing begins with emptying the room. All furniture, rugs, and movable items must be removed to allow full access to the entire floor. If the room has baseboards or trim that meet the floor directly, they are often protected with tape or removed entirely to keep them free of sanding dust or finish.
The floor surface must be thoroughly cleaned before sanding. Dust, debris, and any sticky residue are cleared to avoid interference with the sanding equipment. If nails or staples are present, they are checked and either removed or hammered down to avoid damaging sanding belts or discs. Once the room is clean and free of obstructions, the sanding can begin.
Sanding Down the Surface Layer
Sanding is done with a drum sander or a floor buffer fitted with sanding screens. This step removes the old finish and exposes fresh wood underneath. Coarse-grit sandpaper is usually used at first to strip the floor, followed by finer grits to smooth the surface. The sanding must be consistent across the room, avoiding low spots or uneven edges. Edges and corners are sanded separately with an edge sander or a hand-held sander.
Dust created during sanding is collected using vacuum attachments, though a fine layer of dust often remains and must be cleaned before the next stage. The floor is inspected after sanding to ensure no areas of old finish remain and the surface is flat. Deep scratches or gouges are addressed at this point, either by sanding further or using filler if the damage is minor.
Cleaning Before Applying the Finish
After sanding is complete, the entire floor is vacuumed and wiped down to remove any dust or fine particles. This is a critical step, as even small particles can become trapped in the new finish, creating a rough or uneven surface. Depending on the product being used, the floor may also need to be wiped with a damp cloth or tack cloth to ensure it is fully clean.
Any gaps or cracks between floorboards are filled using wood filler, which is allowed to dry and then lightly sanded to blend with the surrounding surface. The floor must be fully dry and dust-free before the finish is applied.
Applying the Stain (If Desired)
Some refinishing projects include staining the floor to change its color. Stain is applied after the surface is sanded and cleaned. It must be spread evenly and allowed to penetrate the wood. Wiping off excess stain quickly prevents blotches or uneven tones.
Staining is an optional part of refinishing. If the natural color of the wood is preferred, the next step is simply sealing the floor with a clear finish. If stain is used, the drying time must be followed exactly before moving forward to the sealing step.
Sealing and Protecting the Floor
The final stage in how to refinish hardwood floors is sealing the wood with a protective topcoat. The most common finishes are oil-based or water-based polyurethane, though other options exist such as wax or penetrating oils. Each finish has a different look and drying time. The first coat is usually applied using a brush or roller, moving along the direction of the wood grain.
Once the first coat dries, the floor may be lightly sanded again using fine-grit sandpaper or a buffing screen to smooth out any raised grain or imperfections. After cleaning the dust, a second or third coat may be added depending on the desired level of protection.
During this time, the room must remain empty and free of foot traffic. Most finishes need several hours to dry between coats, and full curing can take days. Proper ventilation is maintained to speed up drying and to remove any lingering odor from the finishing product.
Read more: How to Install Laminate Flooring?
Re-Entry and Final Setup
After the final coat is dry, the floor must be left undisturbed for the recommended curing period. This timeframe depends on the product used but can range from 24 hours for light foot traffic to a full week before placing rugs or furniture back. Baseboards or trim that were removed are reinstalled at this point, and the room is returned to regular use.
Refinished floors are more resistant to future wear and appear refreshed. Over time, this process can be repeated as long as the wood surface remains thick enough for sanding. The frequency of refinishing depends on traffic, maintenance, and the type of finish applied during each cycle.
Knowing how to refinish hardwood floors means understanding the complete sequence of steps, from removing the old finish to sealing the new surface. The goal of the process is to restore the wood’s smooth appearance while also renewing its protective layer. Each step—cleaning, sanding, staining, and sealing—is necessary to ensure long-term performance and visual consistency. Floors that are properly refinished retain their function and appearance while extending the lifespan of the original material.
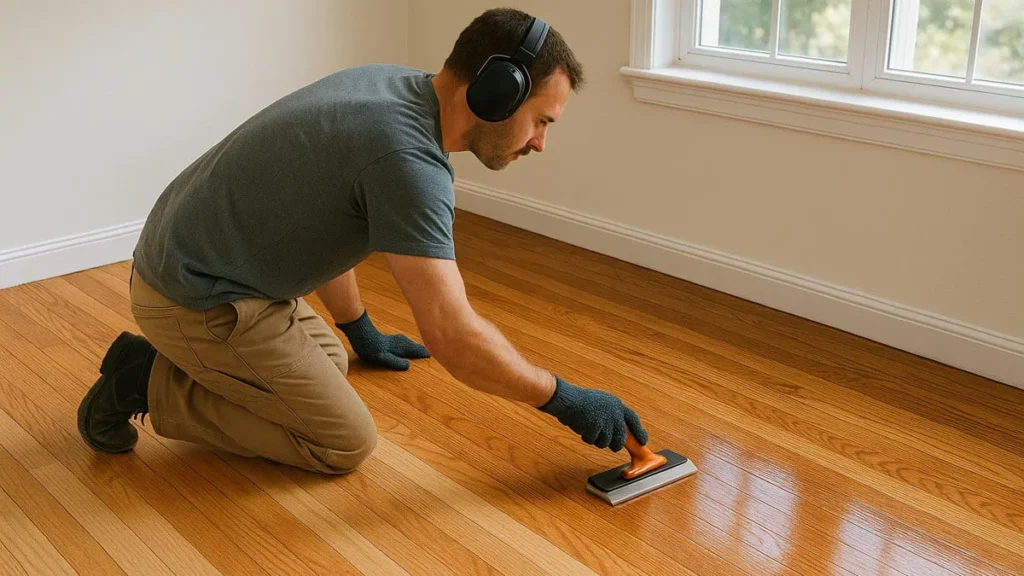
How to Install Laminate Flooring
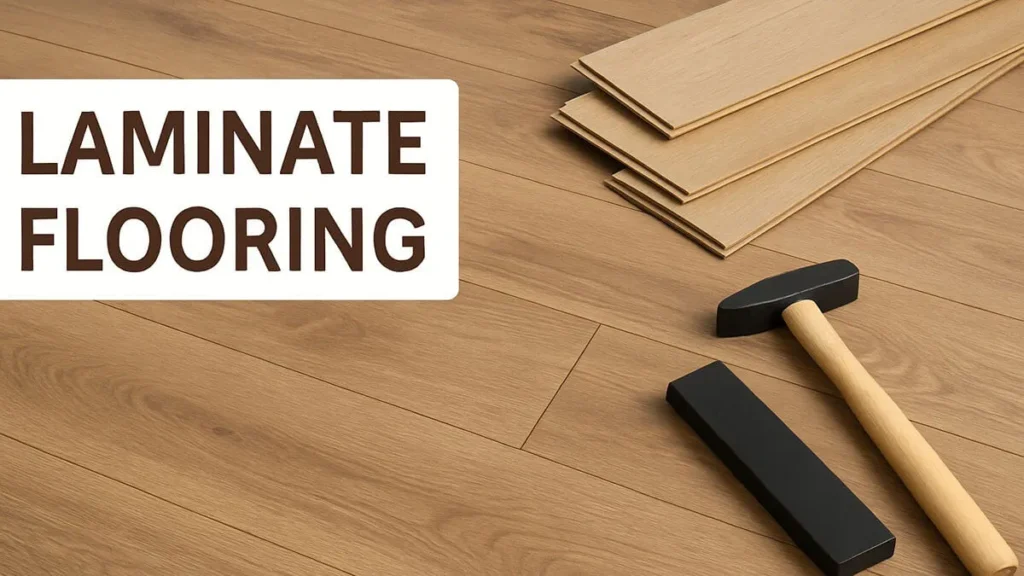
Laminate flooring is a popular choice for homes because it is durable, easy to clean, and comes in many styles. Homeowners often prefer it because it looks like wood or tile but costs less and installs more quickly. If you’re thinking about redoing your floors, learning how to install laminate flooring can help you finish the job without hiring a professional. With the right tools, time, and planning, this is a project most people can handle on their own.
Getting Ready for Installation
Before you start installing anything, the room needs to be clean and clear. Remove all furniture, rugs, and baseboards. If you’re replacing old flooring, it must come out unless the laminate is made for going over it. Most floors work best on a flat, hard surface like plywood or concrete.
Moisture is another factor to consider. If you’re working in a room where water is common—such as a bathroom or basement—make sure there’s a moisture barrier. This plastic sheet goes between the floor and the laminate, protecting the boards from warping. Some laminate planks come with underlayment attached, while others need it added separately.
Once the space is clean and dry, let the laminate flooring sit in the room for a day or two. This gives it time to adjust to the room’s temperature and humidity, which helps prevent gaps or buckling after installation.
Planning Your Layout
Planning where and how the boards will be placed saves time later. Start by measuring the room’s length and width. Divide the total width by the width of one plank to see how many full boards will fit across. This tells you if the last row will need trimming.
You want the first and last rows to be roughly the same width so the floor looks balanced. If the last row will be very narrow, cut the first row a little thinner so the final row comes out wider. Always plan the layout to avoid very small slivers of flooring along walls.
Also, plan your installation so that the boards run in the same direction as the longest wall or the incoming light. This makes the room look more natural and less chopped up.
Starting the First Row
When you’re ready to begin, choose a wall to start against. Most people begin along the longest straight wall. Place spacers between the boards and the wall to leave a small gap. This gap is important because laminate flooring expands and contracts with temperature and humidity. Without room to move, the floor could buckle.
Lay the first board with the groove side facing the wall. Add the next board by snapping the tongue into the groove at an angle, then pressing it flat to lock it in place. Continue this process until the row is finished. If the last board doesn’t fit exactly, measure the gap, cut the plank, and place it in.
Building the Next Rows
The next row should start with a different length board to avoid lining up joints. This not only looks better but also makes the floor stronger. Most people stagger joints by at least 12 inches.
Insert the tongue of each plank into the groove of the one in the row before it. Angle it slightly and then press down to snap it into place. Some boards may need a light tap to lock tightly. Use a tapping block and hammer—not the hammer alone—to protect the edges of the board.
Keep repeating this process row by row. Take your time to make sure each joint is tight and smooth. If a gap appears, check that the board is fully clicked into place and not blocked by dust or a crooked angle.
Cutting Around Obstacles
Many rooms aren’t just square. You’ll probably need to cut boards to fit around door frames, vents, or cabinets. For tricky cuts, trace the shape onto a plank and use a jigsaw or handsaw to cut it out. Always measure twice to avoid wasting pieces.
For doorways, it helps to undercut the trim so the laminate can slide underneath it. This gives a cleaner look and avoids the need for complicated cuts. Use a small hand saw or oscillating tool to trim the bottom of the frame just enough to fit the flooring under it.
Finishing the Last Row
The final row is often the most difficult, especially if it needs to be trimmed lengthwise. Measure the width of the gap between the last full row and the wall, subtract the expansion space, and cut your planks to size. Carefully snap them into place just like the earlier rows.
If there’s not enough space to angle the plank in and push down, try using a pull bar tool. This allows you to hook the end of the board and pull it tightly into position without needing a lot of room.
Installing Baseboards and Transition Pieces
Once the flooring is fully in place, remove the spacers along the walls. The small gaps left by the spacers will now be hidden by the baseboards or quarter round molding. Nail or glue the trim to the wall, not the floor, so the laminate still has room to move.
If your laminate flooring joins another type of floor in a hallway or doorway, use a transition strip. These pieces bridge the gap and create a smooth, finished edge. Different types of strips work for carpet, tile, or other laminate surfaces.
Cleaning Up After the Job
After installation, clean the floor with a vacuum or soft broom to remove any dust or debris. Never soak laminate with water; instead, use a damp mop if needed. Avoid using strong cleaners that could damage the surface or dull the finish.
Throw away or recycle leftover materials properly. Extra planks should be saved in case you need repairs later. They can be stored flat in a dry area. Having matching boards on hand helps if damage ever occurs, especially if the style becomes unavailable.
You may also want to know: What Is LVP Flooring?
Enjoying the Finished Floor
Once the trim is back in place and the surface is clean, the room is ready to use. Most laminate floors are ready for light foot traffic immediately. Just be careful with dragging heavy furniture over it. Use felt pads or furniture sliders to protect the new surface.
Learning how to install laminate flooring is a useful skill for any homeowner. It saves money, increases home value, and gives you control over the look of your space. With careful planning, basic tools, and some patience, you can achieve a professional result without hiring a crew.
What Is LVP Flooring

What Is LVP Flooring? LVP flooring stands for Luxury Vinyl Plank flooring. It is a hard surface flooring material made to look like wood or stone while being constructed from layers of synthetic materials. The product is designed to provide a balance between appearance and function. LVP flooring is commonly used in residential and commercial spaces because of its water resistance, ease of maintenance, and versatile design.
Composition and Structure of LVP
Luxury Vinyl Plank flooring is built from multiple layers. The top layer is a clear wear layer that serves as the surface shield, helping protect against daily wear and surface damage. Beneath that layer is the design layer. This is where the printed image of wood grain, stone, or other textures appears. The design layer is what gives the plank its visual identity.
Next comes the core layer, which provides the flooring with structure and firmness. Others use a rigid core, which is known as either SPC (stone plastic composite) or WPC (wood plastic composite), but some LVP products have a flexible core. Each core type has a different density and durability profile. At the base, there is usually a backing layer that provides grip and absorbs sound.These layers are merge into a single plank, that is designed to be clicked or glued into place during installation.
Available Dimensions and Surface Finishes
Vinyl plank flooring has different sizes. based on the product, widths and lengths can be different, and the thickness approximately ranges from 2 mm to 8 mm or more. The thickness can effect the product’s comfort underfoot and sound reduction abilities.
Surface finishes also be differ. Some LVP flooring comes with a smooth plain finish, but some lvp flooring are embossed to mimic real wood grain or stone surface. The finish affects both appearance and slip resistance. The wear layer can also vary in thickness, which plays a role in how long the surface resists marks, scratches, and surface changes caused by foot traffic or moving furniture.
Uses of LVP Flooring
Areas where moisture and spills are possibe the Luxury Vinyl Plank is generally installed. It is used in kitchens, laundry rooms, bathrooms, and basements. traditional hardwood flooring might be at risk of water damage at these areas. LVP’s design resists moisture from above and below, depending on the installation method and product construction.
It is also installed in living rooms, dining rooms, hallways, and offices where frequent foot traffic occurs. In commercial spaces, it is used in retail stores, medical offices, and lobbies because of its resistance to stains and the ease of cleaning. The lvp flooring can be stable in different temperatures and conditions due to its layered structure.
Installation Types and Methods
There are several installation systems for LVP flooring. One method involves floating planks, which lock together with a click-and-lock mechanism. This system is used for faster installations and it does not even require glue or nails. The planks are not attached directly they sit on top of a subfloor or underlayment.
Another type uses adhesive backing. These planks are peeled and stuck directly to the subfloor. When noise reduction is important or for smaller areas, this method is used. Glue-down installation is third option. Before placing the planks this method uses sticky spread over the subfloor. It is commonly used in commercial settings where permanent bonding is needed.
The subfloor conditions and room type determine which installation method is suitable. Some LVP products are labeled as “loose lay,” meaning they can be placed without glue or click systems if the room dimensions and plank weight allow for it.
Conditions for Proper Installation
Before placing LVP flooring, certain site conditions must be met. The subfloor must be clean, dry, and level. Debris, moisture, or uneven surfaces can affect how the planks lock or adhere. Moisture barriers are sometimes required in areas with concrete subfloors or high humidity levels.
Before installing the LVP flooring, acclimation will be recommended. The planks are placed in the room for at least 48 hours, to be installed. This step helps them adjust to the temperature and moistness of the space. It minimizes the risk of expansion or contraction after installation is complete.
After the installation, Before allowing furniture or foot traffic, LVP should be left without any distrubance for the recommended time. This period can be different on the basis of the type of installation used and the manufacturer’s instructions.
Performance Characteristics
LVP flooring is engineered to be durable. Its wear layer helps it resist surface scratches, dents, and stains. The rigid core variants are especially stable and are less likely to show pressure marks from heavy furniture. The waterproof nature of most LVP products allows them to handle spills without immediate damage. But, the completion can be still dependon the conditions of subfloor and quality of installation.
The material is generally comfortable underfoot and produces less noise than other hard flooring options. Some products include padding on the backing layer to improve sound control and cushioning. Heat resistance can also be different, but LVP can only be affected by extreme temperatures. causing fading or expansion, because of direct sunlight over long time, window coverings may be recommended for certain rooms.
Cleaning and Maintenance Guidelines
Routine maintenance of LVP flooring includes sweeping or vacuuming to remove dirt and dust. Soft bristle brooms or vacuums designed for hard floors are best. For deeper cleaning, a damp mop and pH-neutral floor cleaner may be used. It is not recommended to use steam cleaners or abrasive tools on LVP.
Spills should be wiped up quickly to keep the surface clean. Furniture should have protective pads to avoid pressure marks. Area rugs can be used in high-traffic spots, but rugs with rubber or latex backings should be avoided unless the flooring is compatible. These backings can sometimes cause discoloration over time.LVP flooring does not require waxing or sealing. The wear layer is designed to function without added treatment. If a plank becomes damaged, many styles allow individual pieces to be removed and replaced without disturbing the rest of the floor.
Environmental and Indoor Considerations
Some LVP products meet the indoor air quality standards. Indicating low emissions of volatile organic compounds (VOCs), Manufacturers can label them with certifications. These certifications can be different by area, but they are commonly observed product packaging or included in technical documents.
Disposal and recycling options also vary. Some vinyl planks are recyclable depending on the core materials and regional facilities. If removal is needed during remodeling, check the local guidelines for how vinyl products should be handled.
Read more: How Much Concrete Do I Need?
Summary of Material Attributes
What is LVP flooring? It is a layered flooring material designed to resemble natural wood or stone while offering moisture resistance and durable performance. With multiple installation options, a wide range of finishes, and uses in both homes and commercial spaces, it functions as a strong alternative to traditional flooring materials. Each component of LVP serves a role in its structure, making it suitable for areas where water exposure, high foot traffic, and ease of maintenance are priorities.
