Metal Roof Insulation
Metal roof insulation is one of the most important things in any modern home or business. It helps keep the temperature inside stable and saves energy all year long. Metal roofs are good at conducting heat, so they can get hot quickly in the summer and cool down quickly in the winter. Without insulation, the temperature in your home may change too quickly, making you uncomfortable and costing you more in energy bills. When it’s hot outside, good insulation keeps your home cool, and when it’s cold outside, it keeps your home warm.
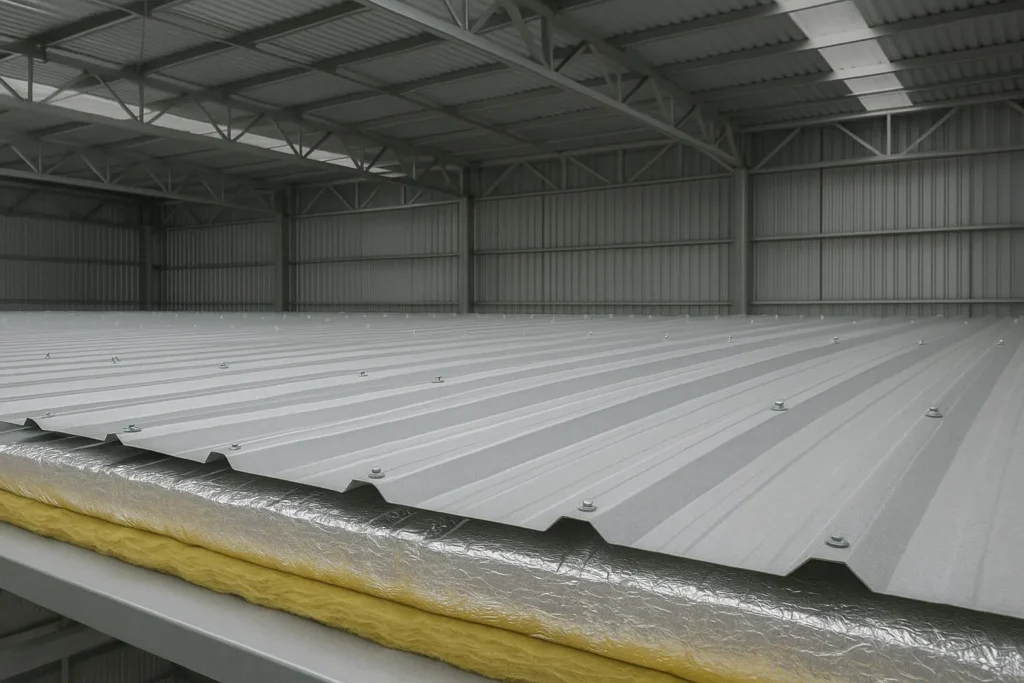
It also helps a lot to keep condensation from happening. When warm air from inside your home hits the cooler surface of a metal roof, it can make moisture that can cause rust or mold. Insulation helps fix this problem and keeps your roof strong and dry. It makes things more comfortable and uses less energy, and it also cuts down on noise from rain, wind, or hail.
What is insulation for metal roofs and why is it important?
Metal roof insulation keeps the roof panels from touching the inside of the house. It keeps the heat out in the summer and the warmth in in the winter. If you don’t have it, your metal roof can let heat directly into your home, that makes your heater or air conditioner work harder. This makes your bills go up and makes you less comfortable. Adding the right kind of insulation makes a layer that keeps heat from moving, which keeps the temperature inside more stable and comfortable. It also makes your HVAC system work better, which will save you money in the long run.
Insulation not only helps keep the temperature stable, but it also keeps moisture from building up under the roof. When air hits cold metal, it can cause condensation, which can lead to rust or water damage. Insulation stops this by keeping the temperature between surfaces the same. It also keeps noise out, which is especially helpful for homes near busy roads or in rainy areas. Proper insulation keeps the temperature more stable, makes less noise, and makes roofing materials last longer. It is one of the easiest and most effective ways to make your home more comfortable and last longer.
Different kinds of insulation for metal roofs
There are many kinds of insulation that work well with metal roofs, and each one has its own set of advantages. Fiberglass insulation is a cheap and popular choice. It comes in rolls or batts and is known for being able to trap the air and keep heat from moving. It is simple to put up and absorbs sound well, so it is good for the homes and garages. Another common choice is foam board insulation, which has a thinner layer but is very good at keeping heat in. It is especially helpful for metal roofs that are flat or have a low slope because it makes them stronger and keeps the temperature stable.
Spray foam insulation is another great option. It expands when applied, filling in small gaps and cracks that could let in air or water. This kind of insulation makes a barrier that keeps air from getting in. It’s great for the older homes or roofs that aren’t straight. Foil-backed materials are used in reflective insulation to reflect heat away from the roof. This keeps the inside cooler in the summer. It works well when used with other types of insulation and is often used in hot places. There are many types of insulation to select from, and the best one for you will depend on your climate, the type of building you have, and your budget. All of these options will help make your home more comfortable and save you money on energy.
Why You Should Insulate Your Metal Roof
There are many benefits to insulating your metal roof that go beyond just keeping the temperature stable. Comfort is the biggest change that you can see. Insulation keeps your home cool in hot weather by stopping heat from moving from the roof to the walls. This balance keeps the temperature inside comfortable all year long and helps lower energy costs. In every room, but especially on the upper floors and in the attic, you will feel the difference.
Another big benefit of insulation is that it protects things. It stops moisture from building up, which can corrode or damage the metal panels. It keeps your roof from leaking or growing mold by controlling the humidity. This makes it last longer. It also helps to cut down on noise. When it rains or hails, metal roofs can be very loud. But insulation makes sound softer, which makes your home voiceless. It helps make the inside of commercial buildings sound better and make work easier.
How to Put Insulation on a Metal Roof
There are a few different ways to put insulation under a metal roof, depending on the type of building and the materials used. When building something new, insulation is often put right under the roof panels before they are attached. Foam boards or fiberglass batts are usually put between the roof frames, but spray foam can also be put directly on the underside of the roof. There are pros and cons to each method, but the goal is always to make a tight seal that keeps air from leaking out.
Read more: Black Metal Roof.
It’s always best to let a pro do the installation. A good contractor knows that how to pick the right insulation thickness and material for your roof design and climate. They will also inspect for any gaps or open spaces that could make the work less effective. Having a professional install your insulation also helps keep moisture out and makes sure it works well for a long time.
Taking Care of Your Metal Roof Insulation
Taking care of your insulation is crucial to keep it working well after it has been put in. Over time, the insulation can settle, get squished, or get damaged by the pests or moisture. At least once a year, check your attic or roof space to find the small problems before they become big ones. Keeping surface well-ventilated also helps to keep the insulation in good shape with keeping moisture from getting the trapped.
Black Metal Roof
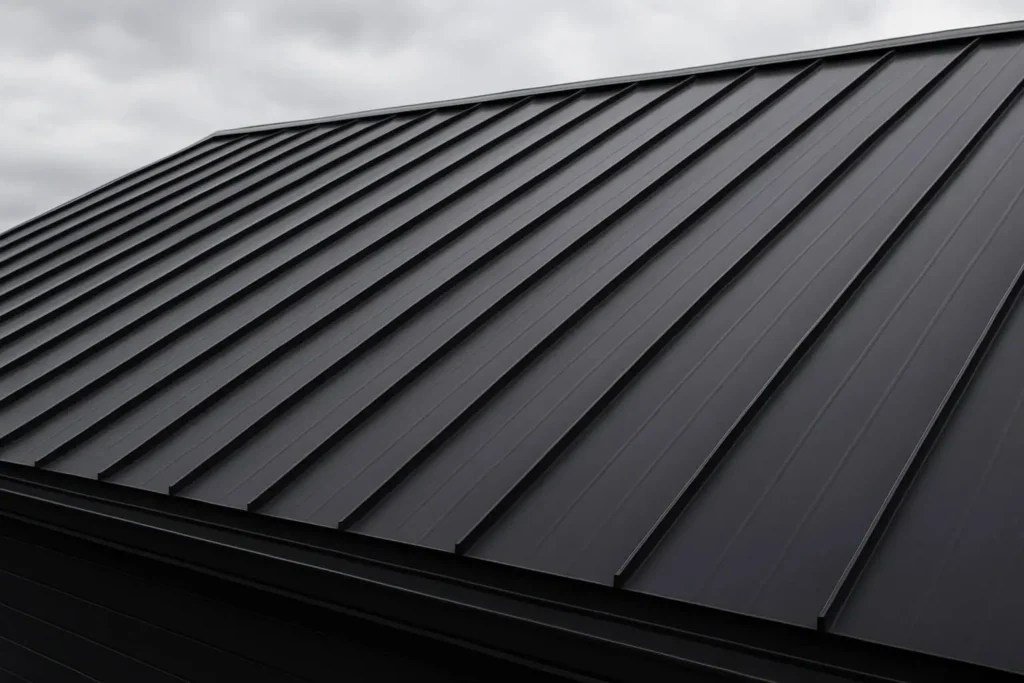
Many homeowners are now choosing a black metal roof for their homes because it looks good and lasts a long time. It has a modern design, is strong, and lasts a long time. The deep black color gives any home a bold, classy look that goes with a variety of architectural styles. Black metal roofs also work well in all kinds of weather, protecting your home from heat, wind, and rain for a long time.
People know that metal roofs last a long time and don’t need much upkeep. A black finish gives a home a polished, high-end look and protects it for years. A black metal roof can be both beautiful and useful if it is installed and cared for correctly. This is why it is one of the most popular types of roofing today.
Why More and More People Are Choosing Black Metal Roofs
Black metal roofs are now one of the most popular types of roofing for both modern and traditional homes. Their bright color gives them a clean, classy look that goes well with brick, wood, and light-colored exteriors. Many homeowners like black roofs because they look great from the street and make homes look more expensive. This color choice also hides dirt and stains better than lighter roofs, which keeps the house looking neat for longer.
Black metal roofs are strong and last a long time, in addition to looking good. They can handle a lot of rain, sun, and wind. So that they work well in many different climates. Quality black coatings keep their color for years, unlike shingles that fade over time. This type of roofing is a great choice for both new homes and renovations because it is both strong and looks good.
Performance and Energy Efficiency
Modern black metal roofs are made with reflective coatings that keep the heat from getting in, even though darker colors usually absorb more heat. This helps keep the inside of the house cooler in the summer. The reflective surface sends sunlight away, which makes the whole thing work better. Because of this, homeowners can have a black roof style without giving up comfort or paying more for energy.
Metal roofs also let more air flow under the panels, which helps get rid of heat that has been trapped. A black metal roof works well even in warm places when it is properly insulated and ventilated. Its strong coating also stops fading, UV damage, and rust. These qualities make it not only pretty but also useful and long-lasting.
Taking care of and maintaining black metal roofs
It’s easy and cheap to take care of a black metal roof. Regular checks help find small problems before they become big ones. After a strong storm, homeowners should look for loose screws, broken panels, or piles of trash. Cleaning the roof once or twice a year keeps dirt, pollen, and other things that could dull the finish off of it.
Use a soft brush or cloth and some mild soapy water to clean. Stay away from strong chemicals that could hurt the protective coating. Cut back trees that are close to the house so that leaves don’t fall on the roof. Moisture that gets trapped can cause stains. A black metal roof will look great and work well for many years if you take care of it properly.
How to Handle a Black Metal Roof Project
Careful planning will help you get the best results if you want to put on a black metal roof. Steel and aluminum are the most common types of metal to use. Steel is very strong, and the aluminum doesn’t rust or corrode in moist areas. To keep your panels safe from the fading or peeling over time, make sure to pick ones with weather-resistant coatings.
Find a roofing contractor who has worked with the metal roofs before. To get the perfect fit, you need to measure correctly, align things accurately, and fasten them securely. Make sure roof deck is clean, dry, and in the good shape before you put it up. For extra protection against the moisture, consider using an underlayment. Finally, get a good paint or finish that is made for metal roofing to keep the deep and elegant black color for a long time.
Black Metal Roofs vs. Other Types of Roofing
Black metal roofs are stronger and last longer than asphalt shingles or clay tiles. Metal roofs can last fifty years or more, but asphalt roofs usually only last twenty years. They also don’t crack, peel, or fade as easily. Metal roofs cost more up front, but they save you money in the long run on repairs and replacements, making them more affordable over time.
Metal roofs are lighter than most other types of roofing, that means they don’t put as much stress on the structure of the home. They are also better for the environment because they can be recycled when they need to be replaced. Black metal roofing gives a clean, classic look that is different from other materials. It’s the perfect mix of modern style and long-lasting protection.
Read more: Repainting Metal Roof.
Long-Term Value and Longevity
A black metal roof is strong and will last a long time. If you put it up and take care of it right, it can protect a home for more than 50 years. The metal panels are much better at resisting corrosion, cracking, and damage from the weather than regular materials. This means that you won’t have to fix the things as often and the cost of upkeep will be lower over time. Homeowners can relax knowing that their roof can handle almost anything that nature throws at it.
A black metal roof not only makes a house stronger, but it also adds value over time. The beautiful color, energy efficiency, and long-lasting quality all make it more likely that it will sell for more. It’s not just an upgrade to the roof; it’s a smart way to invest in the future of your home. If you take care of it, the roof will look great and work well for many years to come.
Repainting Metal Roof
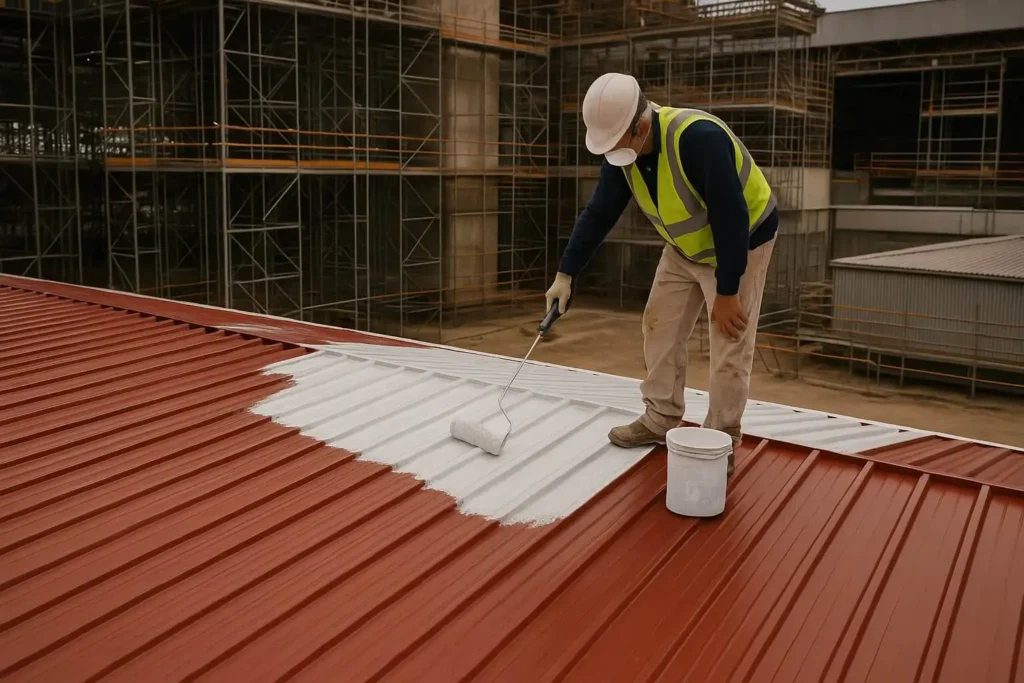
One of the best ways for repainting metal roof look new again and last longer is to repaint it. Sun, rain, and wind can cause colors to fade or small rust spots over time. A new coat of paint brings back the color, protects the surface, and stops the damage from happening again.
Repainting your roof every few years is good for people who live near the coast or in humid areas. It is a cheap way to keep quality and beauty of a home without having to replace the whole roof. If you select the right paint and prepare the roof properly, a repainted metal roof can last a lot longer.
Why It’s Important to Repaint a Metal Roof
Repainting your metal roof does more than just make it look better. It adds an extra layer of protection that keeps rust and corrosion from happening. The strong sun and rain in Florida can wear down paint over time, which can leave metal exposed to the weather.
Repainting not only protects your home, but it also makes it look better and increases its value. A freshly painted roof can make the outside of the house to look brighter and newer right away. This simple upgrade can make a big impression on buyers for homeowners who want to sell.
How to Get a Metal Roof Ready to Paint
Getting ready to paint is the most important step to get the results that last. It is require to clean the roof well to clear the dirt, mold, and old paint flakes. You can clean the surface with a pressure washer or cleaning solution. Let roof dry completely after you clean it. Clean off the rusty spots and repair or replace any parts that are damaged. This makes sure the paint will stick nicely and look smooth.
Then put on a primer that is made just for the metal surfaces. The priming keeps the new paint from peeling off and keeps rust from forming. It is very important to pick a good primer that is made for outdoor use. This step is what makes a strong, long-lasting finish possible. If you don’t prepare ahead of time, your results may be uneven or peel, so it’s worth it to take the time to do it right.
Benefits of Painting a Metal Roof
There are many benefits to repainting a metal roof that go beyond how it looks. This easy way helps to protect your home and keeps the roof in good form for the years.
Key Benefits:
- Restores Appearance: It brings back the original color and shine, making the house look cleaner and newer.
- Stops Rust: New paint keeps air and moisture out, which slows down the process of rusting.
- Makes the Energy Use More Well Organized: The reflective coatings help to keep the homes cooler in summer with lowering how much heat they absorb.
- Maintenance that does not cost a lot: The repainting is much cheaper than putting on a new roof.
- Lasts Longer: A metal roof can last for decades longer if it is taken care of properly.
- Increases Property Value: A roof that is well taken care of makes a home more valuable and appealing.
- This Protects Against the Weather: Paint protects against damage from the sun, wind, and rain.
- Helps the environment: Extending the life of a roof cuts down on waste and encourages the eco-friendly practices.
Picking the Right Paint for a Roof Made of Metal
Choosing the right paint can make a big difference in how long your roof lasts. Acrylic latex paint or oil-based paint made for metal works best on metal surfaces. Even in strong sunlight, these paints won’t fade, crack, or peel. Cool or reflective roof paints are also great for hot places because they keep the roof cooler and lower the cost of cooling.
Make sure the paint will work with the roof’s current coating. Using primer and paint from the same brand makes the bond stronger. Light colors like white, gray, or beige reflect heat and help keep homes cooler.
How often should you paint a metal roof?
There are a number of things that affect how often you need to repaint, such as the weather, the quality of the paint, and how well you take care of it. Because of the strong sun and salty air, roofs in places like coastal Florida may need to be painted every 8 to 10 years. In places that are cooler or less humid, homes might need to be coated every 12 to 15 years.
Regular maintenance can make it longer between repaints. Cleaning up trash, getting rid of leaves, and washing away dirt every few months will keep the roof in good shape. If you see small areas of wear, fix them right away to stop more damage from happening.
Read to know more: New Metal Roof Cost Fort Walton Beach Florida.
Hiring a pro or doing it yourself
Some homeowners want to paint their metal roofs themselves, while others hire professionals to do it. You can save money by doing it yourself, but you need the right tools, safety gear, and knowledge. Painters who do it themselves should use good paint, brushes, and rollers and follow all safety rules.
If you hire a professional roofing painter, you can be sure that the job will be done quickly and correctly. Professionals know how to find problem areas, get the surface ready, and paint it evenly. They also know what materials work best in the weather where they live. Repainting a metal roof has benefits that last a long time.
Repainting a metal roof protects it, makes it look better, and saves you money in the long run. A roof that is well-painted reflects sunlight, keeps the inside cooler, and saves energy. It also stops rust and wear, which makes the roof last longer and saves you money on costly replacements. Repainting your roof every few years will keep it working well in all kinds of weather.
New Metal Roof Cost Fort Walton Beach Florida
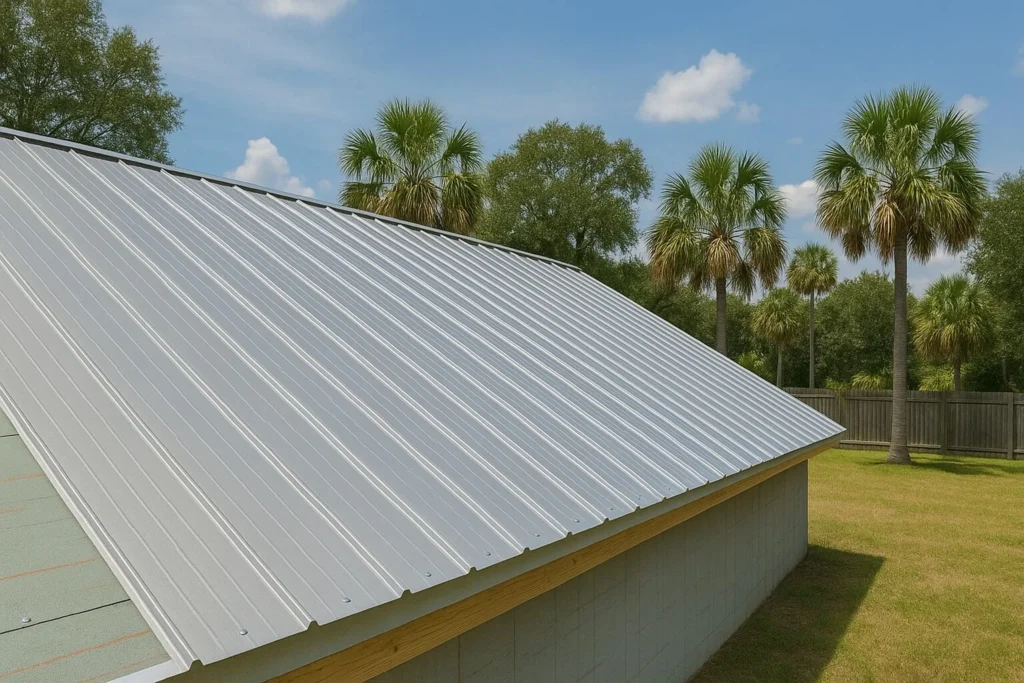
The new metal roof cost Fort Walton Beach Florida depends on a number of things, like the type of material, the size of the roof, and the going rate for labor in the area. Metal roofing is a popular choice for many homeowners in this coastal area because it lasts a long time and can handle Florida’s hot sun, heavy rains, and occasional hurricanes. A new metal roof not only makes a house look better, but it also protects it for a long time and saves energy.
Metal roofing may cost more up front than regular shingles, but it lasts longer and needs less maintenance. Over time, homeowners save money on repairs, replacements, and energy bills.
Things That Change the Price of a Metal Roof
The choices homeowners make during installation will affect how much a new metal roof costs in total. The kind of metal used is very important. Aluminum and steel are the most common choices because they don’t rust or corrode in Florida’s humid and salty air. Roofs made of copper and zinc cost more, but they are unique and last a long time. The size and shape of the roof are also important. It costs more to build roofs that are complicated, have steep slopes, or have more than one level.
Most of the cost is for labor and materials. Most of the time, roofing companies in Fort Walton Beach charge by the square foot, but prices can vary from one company to the next. Other things that can affect prices are insulation, underlayment, and coatings.
Average Prices for Metal Roofs in Fort Walton Beach
A new metal roof in Fort Walton Beach will cost homeowners between $10,000 and $30,000. The size of the house, the shape of the roof, and the type of metal used all affect this wide range. The average cost of installation is between $7 and $12 per square foot. This may seem like a lot more than asphalt shingles, but metal roofs last two or three times longer, so they are cheaper in the long run.
The cost will be lower for smaller homes or roofs that are easy to build. Homes that are bigger and have custom features or more than one roofline will cost more. A lot of roofing companies in the area offer free consultations to help homeowners get a better idea of how much things will cost.
Advantages of Putting Up a Metal Roof
There are good reasons why metal roofing has become one of the most popular options in Fort Walton Beach. One of the best things about it is how long it lasts. In coastal Florida, strong winds, heavy rain, and bright sunlight are all common. Metal roofs can handle all of these things. Metal panels last for decades, unlike shingles, that can crack or curl over time. This makes them a great choice for anyone who wants to feel at ease for a long time.
Energy efficiency is another big plus. In the summer, metal roofs help keep homes cooler and lower energy costs by reflecting sunlight instead of absorbing it. They also don’t get mold, mildew, or bugs.
A Comparison of Metal Roofs and Shingle Roofs
The biggest difference between metal roofs and asphalt shingles is how long they last. With the right care, metal roofs can last up to seventy years, while shingle roofs usually last about twenty years. Shingles are cheaper to put on, but they need to be fixed and replaced more often. In the long run, this adds up to higher costs. Metal roofing is better at keeping out wind and water damage in Fort Walton Beach, where the weather can change quickly.
Metal roofs also make a home look more modern and sleek, which can raise its value. There are many colors and styles to choose from, so homeowners can find one that fits their taste and home style. Metal roofs are becoming more popular because they last longer and use less energy than shingles, even though shingles are more common.
How to Get a New Metal Roof for Less
Putting a metal roof on your house is an investment, but there are ways to save money on it. Get quotes from a few different roofing companies in Fort Walton Beach to get started. Prices can change depending on the time of year, the materials used, and the amount of work that needs to be done. You might be able to get a better deal if you plan your project for the off-season. Some contractors in your area also offer payment plans to help you pay for your work.
Choosing standard metal panels instead of custom ones is another way to save money. Both galvanized steel and aluminum are cheap and last a long time. Proper care after installation can also make the roof last longer, which will save you money in the long run.
How to Find a Reliable Roofing Company
One of the most important things to do when putting on a new metal roof is to pick the right contractor. A skilled worker makes sure that the roof is put on correctly, safely, and in accordance with the law. Check out Fort Walton Beach roofing companies that have good reviews, the right licenses, and insurance. Roofers who have been doing it for a long time know that how the weather is in their area and which materials work best on the coast.
Read more: Concrete Slab Cost.
Get a written estimate from everyone you want to hire that includes the materials, labor, and any other fees. It’s also a good idea to look at pictures of past work or ask local homeowners for references. A reliable roofer will answer your questions clearly and give you a guarantee on their work. Finding a good contractor will save you time and money in the long run, and you’ll get a strong roof that lasts for decades.
The Long-Term Value of a Metal Roof
A new metal roof is more than just a way to improve your home; it’s also a long-term investment. Even though the initial cost may be higher, it quickly pays for itself in lower energy bills, little maintenance, and a higher home value. Many people who own homes in Fort Walton Beach, are happy to know that their roofs will last for decades through hurricanes, heat, and humidity.
Concrete Slab Cost
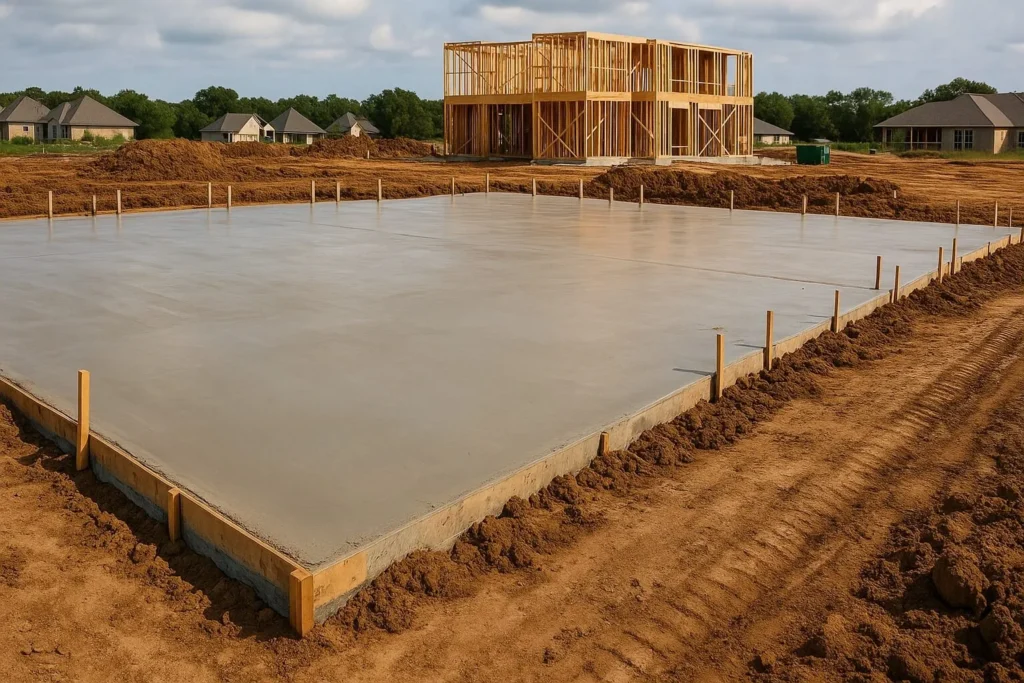
Concrete Slab Cost is one of the first things that homeowners and builders want to understand when they plan for a project. Concrete slabs support driveways, patios, garages, and even the base of many homes. The price relies on the size of the slab, its thickness, and the finish you choose. When you know the cost ahead of time, you can set a clear budget and select a design that fits your needs without surprises. People like concrete slabs because they are strong and durable. They carry heavy loads, stand up to weather, and can last for decades with simple care. The price can change from job to job, however many owners pick concrete because it gives steady value over the years. Learning the average range and the parts that shape the price will help you make a smart choice for your project.
What Makes Up the Concrete Slab Cost
Concrete Slab Cost includes materials and labor. Concrete is usually sold by the cubic yard. A common range is about one hundred to one hundred fifty dollars per cubic yard. How much area that covers depends on the slab thickness. On top of the material, you pay for labor since skilled workers must set forms, pour the mix, level the surface, and finish it the right way.
Other items can add to the bill. Site work comes first. If the ground needs grading, soil removal, or gravel base, that adds cost. Many slabs also need reinforcement, such as rebar or wire mesh, to control cracking. Finishing choices matter too. A broom finish is simple and low cost. Staining, stamping, or polishing adds time and skill, which raises the final price. When you see each part of the total, it is easier to plan and to decide where to spend and where to save.
Average Price Range for Concrete Slabs
On many projects, Concrete Slab Cost for a basic pour falls between four dollars and eight dollars per square foot. A standard two car garage often lands between six thousand and twelve thousand dollars in total. Patios and driveways may land in the same range based on size and thickness. Houses that need thicker slabs or detailed finishes will sit higher. The number can look high at first, but concrete lasts a long time when installed well. Maintenance is simple and repairs are rare when the base is sound and water is managed. Many owners feel the price is worth it because a slab adds value and gives a smooth, stable surface for vehicles, furniture, and heavy tools. In many cases, that long life makes concrete a strong investment.
Factors That Affect Concrete Slab Cost
Many things can change Concrete Slab Cost. Thickness is a major one. A four inch slab is common for patios and driveways. Garages or areas that support heavy loads may need five inches or more. More thickness means more concrete and a higher price. Size matters as well. Larger areas need more material and more labor hours.
Location also plays a crucial role. In some places, labor rates and delivery fees are higher. Access to the site can add cost. If a truck cannot reach the forms, the crew may need pumps or extra helpers to move the concrete. Finish choice changes price too. A plain gray surface is the least expensive. Stamped, exposed aggregate, or stained looks cost more because they take extra time and skill. Knowing these factors helps you control cost while getting the slab you want.
Comparing Concrete Slabs to Other Surfaces
When you compare the materials, concrete offers a solid balance of price and durability. Asphalt often costs less to install, however it does not last as long and can soften or crack in heat and cold. Pavers look great and can be repaired piece by piece, but they cost more and need careful base prep to avoid shifting. Gravel is very affordable but does not give a smooth, stable finish and can wash out. Concrete stands out for strength. It resists weather, carries heavy loads, and keeps a clean shape for many years. While upfront price is higher than gravel or some asphalt jobs, the long service life makes concrete a good value over time. For owners who want a clean look and a tough surface, a slab is often the best fit.
Real Experiences from Homeowners and Builders
Many homeowners who install slabs say the money was well spent. Concrete driveways and patios stay neat and sturdy with basic care. Builders appreciate that a slab gives a firm, level base for garages and homes. Some people note that the first price felt high, but the strength and long life saved money later because they did not need frequent repairs.
There are challenges to note. Poor site prep, weak drainage, or a rushed finish can lead to early cracks. That is why many owners hire trained crews even when labor costs more. The common view is that a well planned and well built slab adds both beauty and durability to indoor and outdoor spaces.
Tips to Save Money on Concrete Slab Installation
The cost of a basic sweep finish is less than a stain or stamp job. Get written quotes from several contractors so you can compare prices and what each price includes. Scheduling work in a slower season can lower labor costs because crews have more open days.
If you have the skill and the tools, you can lower costs by doing safe prep tasks yourself. Clearing grass, removing old material, or setting basic layout lines can reduce labor time for the crew. After the pour, protect your slab. Clean it as required, seal the surface when the contractor recommends, and avoid heavy impacts. Good care extends life and helps you avoid repair bills.
Read more: Can You Paint Vinyl Siding?
The Future of Concrete Slabs
Concrete work is moving toward cleaner mixes and smarter tools. New designs use recycled content or blends that cut carbon while keeping strength. That helps the environment while keeping the durability people expect. Crews are also using better reinforcement methods and control joints to reduce the cracks and extend life.
Technology is improving the way slabs are placed and finished. Laser guided leveling helps create smooth, even surfaces. Mix control and curing methods support a stronger final product. Homeowners also have more finish choices, with colors and textures that match many styles.
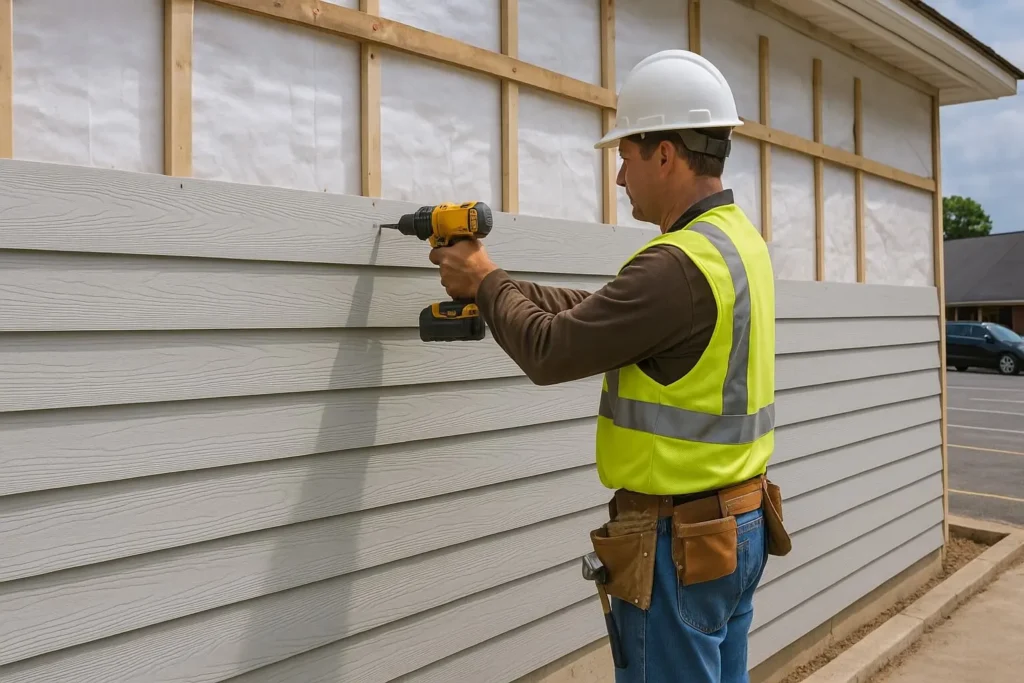
Can You Paint Vinyl Siding?

A lot of people who own homes wonder about can you paint vinyl siding. Yes, however there are some important things you need to know before you start the project. People like vinyl siding because it is strong, easy to care for, and cheap. But after years of being outside in the sun and rain, it might lose its shine or start to look old. Painting is a popular choice for homeowners who want a new look without having to replace the whole outside.
It’s not as easy as just getting some paint and a brush to paint vinyl siding. To get results that last, you need the right materials, to prepare properly, and to be careful. A coat of paint can make your home look new again if you do it right. Many homeowners choose to paint their homes instead of spending a lot of money on new siding. Painting is a cheap and effective way to update and refresh the look of their homes.
What Homeowners Think About Painting Vinyl Siding
Vinyl siding is meant to last for a long time, but that doesn’t mean it always looks its best. Over time, dirt, rain, and sunlight can make things fade or change color. Many homeowners notice that their siding looks old or dull. That can make the whole house look worse. A new coat of paint can make a house look better right away and bring back its charm. Homeowners can also change the style to something more modern or something that fits their taste better with picking up a new color.
Cost is another reason why many people choose to paint instead of replace. Painting costs a lot less than putting up new siding. It gives homeowners a big visual boost without costing them a lot of money. Also, painting is faster and less disruptive than a full replacement project. Painting is often the best way for families to get a new look without a lot of stress.
How to Pick the Right Paint for Vinyl Siding
One of the most important parts of this project is selecting the right paint. Not all paints are good for vinyl. Experts say to use high-quality acrylic latex paint that is made for vinyl siding on the outside. This paint is flexible and strong, so it can stretch and shrink with the siding as the weather changes. Using the wrong paint can make things peel, crack, or fade much faster than you think.
Another important thing is the color. Dark colors might look nice. However they can soak up too much heat and make the vinyl bend. Light and medium colors are usually the safest because they reflect heat better. It’s also a good idea to check the manufacturer’s warranty before you buy paint. Painting may change coverage in some cases. Choosing the right paint and color takes time, but it will make your project look great and last for years.
Getting Your Siding Ready to Paint
A long-lasting paint job starts with good planning. Before the painting, you need to completely clean the vinyl siding. Paint won’t stick well if there is dust, dirt, or mildew on the surface. A pressure washer works well, but you can also use soap and water to scrub it clean. Let the siding dry completely before painting it, because painting on a wet surface will cause problems later.
After cleaning the siding, check for cracks, holes, or panels that are loose and need to be fixed. Fixing these problems before you paint will make the finish smoother and keep your home safe from the water damage. Using the painter’s tape to cover windows, doors, and trim helps you get clean lines. It also prevents drips from occurring. How well your siding looks after painting and how long it lasts depend a lot on how much work you put into getting ready.
How to Properly Paint the Vinyl Siding
The right tools make painting easier and more professional when it’s time to do it. Many people like to use a paint sprayer because it quickly and evenly covers a lot of area. You can also use a roller on flat surfaces, but brushes work better on edges and small details. No matter which method you choose to get a thin plain coat.
When painting vinyl siding, the weather is very important. Pick a day that is warm, has little wind, and won’t rain. Very hot or very cold weather can change how quickly the paint dries. After putting on the first coat, wait until it is completely dry before putting on the second. If you have the right tools, know-how, and patience, you can get results that look professional and last for a long time.
Things to Avoid When Painting Vinyl Siding
One big mistake that homeowners make is not cleaning. If you paint over dirt, mold, or chalky buildup, the paint will peel off quickly. Picking the wrong kind of paint is another common mistake. Vinyl won’t hold up to regular interior paint or cheap exterior paint. To save the time and money, always use paint that is made for this type of material.
Some people also make the mistake of doing the job too quickly. If you paint too thickly, skip the second coat, or paint in bad weather, you might not get the results you want. Choosing a color that is too dark is another problem because it can hurt the siding.
Read more: Can You Paint Treated Lumber?
Reasons to Paint Vinyl Siding Instead of Replacing It
One of the best things about painting vinyl siding is that it saves money. It can cost thousands of dollars to replace something completely, but painting is a lot cheaper. This makes it a good choice for homeowners who want to change the look of their homes without spending a lot of money. A professional-quality paint job can make siding look new and stylish for a lot less than replacing it.
Another great thing about it is that you can make it your own. When you replace siding, you usually have to stick with the colors that the manufacturer offers. But when you paint, you have a lot more choices. You can choose a color that shows off your style, goes with your neighborhood, or makes your landscaping stand out.
Can You Paint Treated Lumber?

Many homeowners and DIY builders often wonder that, can you paint treated lumber? The answer is yes, you can, however the procedure takes more care than painting regular wood. Treated lumber is commonly used for decks, fences, porches, and outdoor furniture because it is designed to resist rot, insects, and harsh weather. However, this special treatment also makes painting a little tricky.
If you hurry in painting the treated lumber without right preparation, so the paint may peel, bubble, or fade quickly. The secret is, the patience and proper technique. Allowing the wood to dry fully, selecting the right paint, and following the step-by-step approach will give you a smooth, attractive finish. With the right care, painted treated lumber can last for years with adding style and protection to your outdoor projects.
Why Painting Treated Lumber Matters
Treated lumber is designed to stand up against moisture, bugs, and decay, but it is not indestructible. Over time, constant sun exposure, heavy rains, and freezing winters can still wear it down. Adding a layer of paint creates another shield that helps the wood in stay stronger and last longer. This extra protection means that fewer repairs and less maintenance in the future. This saves the time and money.
Painting treated lumber is not only about the strength, it also about appearance. The natural color of the treated wood is often greenish or brownish, so that it may not match your home or yard design. Paint allows you to transform it into any shade you like, whether bold or neutral. With paint, you can blend your deck with your house, brighten up a fence, or create a polished outdoor look that feels complete.
How Long Should You Wait Before Painting
Patience is the most important step when it comes to painting treated lumber. Freshly treated wood usually holds a lot of moisture and chemicals. If you paint too soon, the paint will sit on top instead of soaking in, leading to peeling and flaking later. Most experts suggest waiting at least a few months before painting. In some climates, you may even require to wait up to six months.
You can check readiness with a simple water test. Sprinkle a few drops of water on the surface. If the water beads up, the lumber is still too wet. If it soaks in quickly, your wood is ready for primer and paint. Rushing this procedure often leads to frustration, while waiting ensures that your hard work lasts. Taking the time to let the wood dry fully is the key to a strong and beautiful paint job.
The Best Paint for Treated Lumber
Not all paints are made for treated lumber, so choosing wisely makes a big difference. Acrylic latex paint is the top choice because it allows the wood to breathe while still creating a protective layer. Oil-based paints tend to trap moisture inside the lumber, which can cause cracking, bubbling, or mildew. A high-quality exterior acrylic paint offers flexibility and weather resistance, which is perfect for outdoor wood projects.
Before you apply paint, always use an exterior primer made for wood. Primer prepares the surface, helps the paint bond, and prevents stains from bleeding through. It also evens out the color, giving you a smooth finish. Skipping the primer may save the time at first, however the paint will not last as long. When you invest in good primer and durable exterior paint, your project looks better and stays strong against rain, sun, and snow.
Tips for Preparing the Surface
Preparation is just as important as painting itself. Start with cleaning your treated lumber to remove dirt, dust, and the leftover chemicals from the treatment procedure. You can use warm soapy water and a stiff brush to scrub the surface. After cleaning, let wood dry completely. A clean and dry surface makes sure that paint sticks properly instead of peeling away later.
Once the lumber is dry, sand the surface lightly. The sanding smooths out the rough spots and opens up the pores of the wood. So, the paint can grip better. Pay close attention to the corners, edges, and rough patches where the paint is not apply evenly. If you skip sanding, you may end up with a patchy or weak finish. Proper cleaning and sanding give your project the solid foundation it requires for long-lasting results.
Common Mistakes to Avoid
Painting treated lumber seems easy, but there are common mistakes that can ruin the project. The biggest mistake is painting before the wood has dried. Wet wood will push the paint from the surface, causing it to bubble and peel within the weeks. Another common issue is skipping the primer. Without primer, the paint will sink unevenly into the wood and fail to stick properly, with leaving your project looking unfinished.
Using the wrong type of paint is another trap. Indoor paints or cheap exterior paints cannot handle the demands of treated lumber and outdoor weather. They can fade, crack, or even grow mold. Some people also forget to prepare the surface by cleaning and sanding, which makes the paint job weak. Avoiding these mistakes is simple when you follow the right steps. By patience and preparation, you can achieve a smooth, durable, and professional-looking finish.
Read more: Hardie Plank Siding Cost.
The Final Thoughts on Painting Treated Lumber
Painting treated lumber may take extra time, however the results are worth it. With the right preparation, the right paint, and enough patience, you can create an outdoor project that is both strong and beautiful. From decks and fences to garden boxes and furniture, painted treated lumber brings style and long-lasting protection. A little effort today can keep your wood looking fresh for many years.
Always remember that every step matters. Cleaning, drying, sanding, priming, and painting all play a role in making your project successful. Skipping the steps or hurrying, will only lead to peeling and frustration. By doing it the right way, you gain both durability and design. Painting treated lumber is possible and it is a smart way to protect your investment and add beauty to your outdoor space.
Hardie Plank Siding Cost
Hardie Plank Siding Cost is something that many homeowners want to understand before starting a project. Hardie Plank is a fiber cement siding known for strength, long life, and a classic wood look. People select it because it stands up to fire, pests, and tough weather better than many other materials. Knowing the cost ahead of time helps you set a real budget, compare options, and avoid surprises once work begins. It also helps you talk with contractors using clear numbers and a shared plan.
The price you pay depends on several things, including the size of your home, the style you select, and labor rates where you live. The material is not the cheapest, but it often delivers better value over time because it protects the house for decades with less repair. When you add in fewer fixes and steady curb appeal, the total cost of ownership can be lower than it first appears.
What Makes Up the Hardie Plank Siding Cost
Hardie Plank Siding Cost usually combines materials and labor. The boards are sold by the square foot, and most homes need hundreds of square feet to cover exterior walls. Material alone often ranges from two to five dollars per square foot. Once you add installation, the total rises, because proper siding work takes skill, tools, and time. Crews need ladders, brakes for bending metal trim, safe staging, and careful weather planning.
Other items can also affect the final bill. Hardie offers smooth boards, wood grain textures, and profiles that mimic traditional styles. Premium colors and special finishes may add cost. You can also see delivery fees, trim and corner pieces, house wrap, flashing, caulk, and insulation. If the job needs new soffits or fascia, that adds more line items. When you understand every part of the price, you can plan better and avoid paying for extras you did not expect.
Average Price Range for Hardie Plank Siding
When looking at Hardie Plank Siding Cost, it helps to see the full job range. For an average sized home, total cost often falls between ten thousand and twenty thousand dollars. Smaller homes can be less, however large houses or complex designs cost more. This range includes materials and professional installation. Ask each contractor what is included so you know the number covers tear off, disposal, trim, and paint.
While the number may be higher than vinyl, think about long term value. Hardie Plank can last for decades and resists warping, rot, and insects. Many owners treat it as an investment because it reduces repairs, keeps curb appeal high, and can even lift home value. You may pay more up front, but you often save over the life of the siding. A strong warranty and a proven brand also bring peace of mind.
Factors That Affect Hardie Plank Siding Cost
Some factors change Hardie Plank Siding Cost. Home size is the first one. Bigger homes need more boards and more labor hours. Style also matters. Simple lap siding is usually cheaper than special patterns that need extra cuts and careful fitting. Corners, trim details, and decorative bands add time, which adds cost.
Labor rates vary by area. If construction labor is expensive where you live, installation will cost more. Access plays a role too. Two story homes, steep grades, tight lot lines, or many angles can slow the crew and add to the price. Removing old siding adds labor and disposal fees, however installing over sound sheathing can save time when allowed by code. Weather can also affect cost if rain or wind causes delays.
Comparing Hardie Plank to Other Siding Options
Compared with other choices, Hardie often costs more than vinyl but less than brick or stone. Vinyl is usually the lowest price and installs quickly, but it can fade, crack, or warp over time. Brick and stone last a very long time, yet they can cost two to three times more than Hardie. Fiber cement sits in the middle, offering durability without the very high price of masonry. Many owners feel it delivers a good balance of strength, look, and price.
Hardie also looks closer to real wood than many vinyl products. You can select from a wide range of colors and textures to match your style. When you compare options, look at both the upfront price and the long term value, including maintenance, repainting cycles, and expected life. Think about climate, sun exposure, and the look you want on your block.
Real Experiences of Homeowners Using Hardie Plank
Homeowners who install Hardie Plank often report strong results. Many say their homes look sharper and feel better protected from storms and pests. Some note that even the initial price was higher than vinyl, but they saved money later by avoiding frequent repairs or replacements. The siding tends to hold its shape and color for years when maintained as recommended. It takes paint well, so color refreshes last longer too.
A few owners point out that the first cost stretched their budget and that skilled installation was essential. Even so, most feel the project was a good investment because the siding increased curb appeal, added confidence during bad weather, and supported resale value. They also like the solid feel when tapping the boards and the quiet performance in strong wind.
Tips to Save Money on Hardie Plank Installation
Get at least three written quotes from licensed contractors. Prices and scopes vary, and multiple bids help you compare fairly. Ask about scheduling in slower seasons when crews may give better rates. Request a line item proposal that separates materials, labor, and extras, so you can see where savings are possible.
Keep designs simple to cut labor time. Standard lap profiles and common colors usually cost less than custom looks. If your existing exterior is sound and code allows, you may reduce costs by avoiding full tear off. After installation, follow basic care like gentle washing and timely repainting.
Read more: The best Quantity Takeoff Software.
The Future of Hardie Plank Siding
Siding is changing with new tech and greener goals, and Hardie is part of that trend. Expect ongoing improvements in coatings that resist fading, along with colors that stay bright longer. Manufacturers are also exploring more eco friendly processes and materials while keeping the same strength and safety. Better recycling programs and cleaner plants are likely to grow over time.
The best Quantity Takeoff Software

Finding the best quantity takeoff software can save builders, contractors, and architects many hours of manual work. In construction, accurate takeoffs are the first step to building a reliable budget and avoiding mistakes. These tools let you calculate materials, labor, and costs with speed and accuracy. Instead of using paper plans or guesswork, you can rely on software to deliver real numbers for your project.
Technology has changed how construction is planned. The right software makes it easy to measure digital drawings, estimate quantities, and share results with your team. For anyone working in construction, using a top takeoff software is so convenient. It is quickly becoming essential for success.
Why the Best Quantity Takeoff Software Matters
Choosing the best quantity takeoff software affects both accuracy and efficiency. Takeoffs form the base of a project budget, and even small errors can become major cost overruns. With software, you reduce these mistakes by using automated measurements and material databases. This helps you create reliable numbers that clients and teams can trust. When you compare tools, remember that the best quantity takeoff software should raise accuracy and cut rework at the same time.
Speed matters as well. Manual takeoffs can take hours or even days on large jobs. The right program speeds up the process so professionals can focus on planning and execution instead of math. By improving both speed and reliability, quantity takeoff software becomes one of the most valuable tools in modern construction.
The Future of Quantity Takeoff Software
Construction is moving toward more advanced technology every year, and takeoff software is part of that shift. In the near future, artificial intelligence will scan digital drawings and calculate materials with very little human input. This will make the process faster and reduce the chance of mistakes.
Another growing trend is Building Information Modeling, also called BIM. Many modern takeoff tools already connect to three dimensional models, which lets estimators measure and calculate in real time as designs change. This means projects can be planned more accurately from the start. Cloud based collaboration is expanding too, so teams can work together from anywhere on the same files.
These changes show that quantity takeoff software is not only a tool for today. It is a foundation for how projects will be planned in the future. For contractors, architects, and project managers, staying current with these tools will be the key to staying competitive.
Key Features Found in the Best Quantity Takeoff Software
When you look for the best quantity takeoff software, focus on features that make work easier. Good software should let you upload digital blueprints and measure directly on the screen. This removes the need for printed drawings and rulers. Many programs also include tools that count items like doors, windows, and fixtures automatically.
Integration is important. Top software connects with project management and estimating systems, so you can move numbers into budgets and schedules without retyping. Cloud storage helps because teams in different places can access the same takeoff files. The best programs are simple to use, save time, and reduce the risk of mistakes.
How the Best Quantity Takeoff Software Improves Accuracy
Using the best quantity takeoff software improves accuracy in clear ways. Manual calculations are open to human error, especially on complex projects with many details. Software uses consistent formulas and digital measurements to keep results precise. Even tricky spaces like angled walls or irregular surfaces can be measured with more confidence.
exactness builds trust. Clients, contractors, and suppliers want estimates that feel realistic. With software, you present numbers that are clear and easy to defend. This reduces disputes during construction and keeps budgets under control. In the end, better accuracy leads to smoother projects and stronger professional reputations, which is exactly what you expect from the best quantity takeoff software.
Step by Step Guide to Choosing the Right Takeoff Software
In finding the best quantity takeoff software, First, list your project needs. Do you handle small residential jobs or large commercial builds. Once you know your needs, compare software that fits your work. Look for features like digital plan upload, automatic counting, and integration with estimating tools. Always test the program with a demo, if one is available, so you can see how it works on real drawings.
After that, look for your budget. Some programs are low cost or free, but others are premium products with advanced features. Balance the price with the value you gain from accuracy and time savings. Finally, think about training. The best program is one your team can learn quickly and use every day without frustration. By following these steps, you can select a tool that fits your projects.
Comparing Different Quantity Takeoff Software Options
Not every program offers the same performance. Some are built for small projects, while others are designed for large commercial or industrial work. When you compare options, consider cost, ease of use, and fit with your current tools. Few programs need advanced training, while others are friendly for beginners.
Popular tools may include support for three dimensional models, automatic scaling, or direct links to cost databases. Others may focus on collaboration and let teams share and edit takeoff files in real time. The best choice relies on your needs, but the goal stays the same. You want fast, accurate, and reliable takeoffs that improve planning across the project.
Read more about: Construction Estimator Certifications.
Real World Benefits of Using Quantity Takeoff Software
In actual projects, takeoff software has changed how teams work. Contractors use it to prepare competitive bids that win the more jobs. Architects use it to check whether designs match budget limits before work begins. Suppliers benefit as well because they receive clear and accurate requests for materials.
These tools also help with time management. Instead of spending days on manual calculations, professionals can finish takeoffs in hours. The extra time can be used to review designs, coordinate with teams, or answering client questions.
Construction Estimator Certifications
Getting Construction Estimator Certifications is one of the smartest steps for anyone who wants to grow in the construction field. Employers and clients depend on accurate estimates to control costs, avoid delays, and keep projects on track. A certified estimator shows that they have the training, the tools, and the judgment to deliver reliable numbers. That proof builds trust and helps teams to prevent costly mistakes during improving overall efficiency on every job.
Certifications also boost confidence for both clients and employers. When a professional has official training and recognition, it signals that their work meets clear industry standards. That trust can lead to the bigger projects, stronger client relationships, and steadier work. For anyone serious about moving up in their career, earning a certification is a choice that pays off over time and shows real commitment to quality.
Why Construction Estimator Certifications Matter
Construction runs on precise information. Small mistakes in cost can become big financial problems later. Construction Estimator Certifications give owners and contractors assurance that the estimator knows how to avoid those risks. A certified professional understands materials, labor, equipment, scheduling, and codes, and can turn that knowledge into a clear strategy that fits the budget and supports the schedule.
In a competitive market, certifications are more than a badge. They are a real advantage. Employers want people who show steady learning and high standards. Clients prefer certified estimators because it lowers the risk of missing costs or forgetting key items. By certification, an estimator proves they can meet deadlines, handle complex scopes, and offer honest, transparent pricing. That credibility often leads to repeat work, better referrals, and long term partnerships.
Another reason these credentials matter is teamwork. Estimators work with project managers, superintendents, suppliers, and accountants. A certified estimator knows how to speak the same language as each group. They can explain the reason behind each number and help the team make smart choices about methods, materials, and timing. This kind of clear, simple communication reduces confusion and keeps everyone focused on the plan.
Pathways to Becoming a Certified Estimator
There is more than one way to earn Construction Estimator Certifications. Many colleges and technical schools provide programs that mix classroom lessons with practical exercises. You may study blueprint reading, quantity takeoff, project controls, contracts, and construction technology. Online courses make it easier to balance training with a full time job, and many include practice projects you can add to your portfolio.
Some certifications require industry experience, while others welcome newcomers who want to start a career. Advanced credentials may require a tough exam, proof of completed work, or letters of recommendation. Many programs also expect continuing education. This keeps you up to date on new products, delivery methods, green building standards, and modern estimating software. By choosing a pathway that matches your goals and learning style, you can build skills step by step and move forward with confidence.
Benefits of Becoming Certified
Being certified gives you the benefits that go far beyond a line on your resume. It brings recognition, credibility, and real career growth.
- Stronger credibility with employers, contractors, and clients
- Better chances for promotions and leadership roles
- More stability even when the market changes
- Higher earning potential over time
- Recognition across the wider construction industry
- Access to helpful networks and professional groups
- Confidence when pricing complex scopes
- Ongoing learning that keeps skills current
- Clearer communication with owners and design teams
- Better risk control and fewer cost surprises
Each of these advantages supports long term success. For many professionals, certification is not only about job. It is about building a reputation that lasts and a skill set that can travel with you from one region to another and from one project type to the next.
Skills You Gain Through Certification
Construction Estimator Certifications build both technical and people skills. On the technical side, you learn detailed quantity takeoff, cost analysis, and risk planning. You practice using industry software for drawings, takeoffs, pricing, and reports, that speeds up your work and raises accuracy. You also study scheduling basics so your numbers line up with the timeline and support smart sequencing.
You also learn how to write clear scopes of work and how to review bids from subcontractors. You learn to compare apples to apples and spot gaps in coverage. This protects the budget and makes awards fair and transparent.
On the people side, certification training helps with communication and problem solving. Estimators often explain costs to clients who are not experts. Clear, simple language builds trust and reduces conflict. Many programs also cover ethics and standards, so decisions are both profitable and responsible. This mix of hard and soft skills helps you work well with designers, contractors, suppliers, and owners.
Top Certification Programs to Explore
Not all programs are the same, so it pays to choose carefully. Well regarded options often come from national associations and accredited schools. These programs blend real examples with solid theory, so that you learn how to apply methods on live projects. Many offer flexible schedules for people who work full time, and some offer recorded lessons so you can study at your own pace.
High quality programs may include topics like sustainable methods, advanced delivery systems, cost modeling, value analysis, and digital estimating tools. Some add mentoring, career fairs, mock interviews, and guest talks from industry leaders. Look for clear accreditation, a current curriculum, up to date software training, and strong links to employers. That way your credential has value in more than one market and helps you stand out when roles are competitive.
Read more: Estimating Cost to Build a Bowling Alley.
Career Opportunities After the Certification
Certification can open doors. Certified estimators are frequently preferred for roles at major contractors, specialty trades, engineering firms, and public agencies where the accuracy matters. With experience, many move into the senior estimator, preconstruction manager, project manager, or cost consultant roles. These positions bring higher pay and a bigger voice in key decisions about design, schedule, and buyout.
Public work and large private jobs often require proof of qualifications. A recognized credential can meet that requirement and make your proposal stronger. In addition, many owners now ask for clear cost plans at early design stages. A certified estimator can provide that service and guide the team as the drawings grow from concept to final set. This helps control cost drift and keeps the project within the target budget.
